Breakfast & Brunch
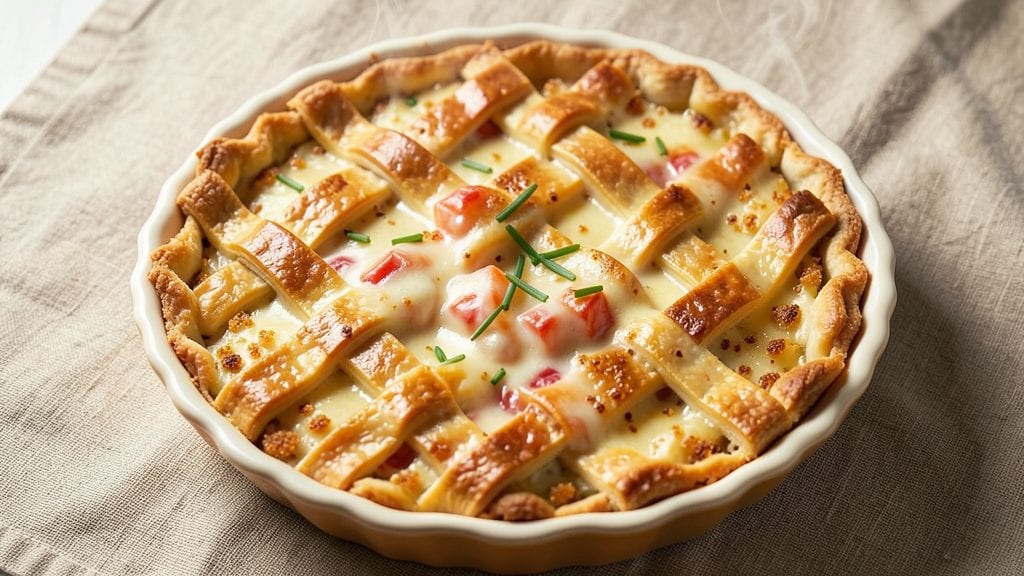
This Bisquick cheese quiche delivers the perfect balance of golden crust and creamy, velvety filling in just 45 minutes—no pie crust required. The secret lies in Bisquick's foolproof baking powder blend, which creates a tender, flaky crust while the egg-cheese mixture sets up silky smooth.
I developed this recipe after years of testing shortcuts that still tasted homemade, and this version consistently wins over brunch crowds. The key is a precise 350°F bake that ensures the crust stays crisp while the center remains perfectly set.
What sets this quiche apart is how effortlessly it comes together—no rolling dough or tricky blind-baking steps. You'll start with a simple Bisquick crust pressed into a pie dish, then pour in a rich egg mixture loaded with sharp cheddar and a touch of cream.
The filling transforms into a velvety, custard-like center with just the right amount of stretch, while the crust maintains its golden-brown perfection. This recipe proves that quick doesn't mean sacrificing quality.
By the time you pull it from the oven, you'll have a quiche with a crisp, buttery crust that holds its shape and a filling so smooth it practically melts on your tongue.
The cheese pulls into delicate strands as it cools, creating that signature quiche texture that makes it impossible to resist. Slice into wedges and serve with a simple arugula salad or crusty bread—it's the kind of brunch dish that feels both impressive and effortless.
Perfect for weekend mornings, potlucks, or meal prep, this quiche reheats beautifully and keeps well for up to 4 days. The recipe scales easily for larger gatherings, and you can customize it with add-ins like spinach, mushrooms, or bacon. Let's get baking—your taste buds will thank you.
Ingredients for bisquick cheese quiche
Golden crust meets velvety filling—just six ingredients transform into brunch perfection.
| Ingredient | Amount | Notes |
|---|---|---|
| Bisquick Baking Mix 🍞 | 1 ½ cups | Original flavor for classic taste |
| Unsalted Butter 🧈 | ½ cup | Cold, cubed for crust texture |
| Sharp White Cheddar Cheese 🧀 | 1 ½ cups | Shredded fresh for best flavor |
| Large Eggs 🥚 | 6 whole | Room temperature for smooth filling |
| Heavy Cream 🥛 | ½ cup | Full-fat for velvety texture |
| Whole Milk 🥛 | ¼ cup | Warmed slightly for best blend |
| Salt 🧂 | ½ tsp | Kosher or sea salt preferred |
| Black Pepper 🌶️ | ¼ tsp | Freshly ground for best flavor |
| Garlic Powder 🧄 | ½ tsp | Not garlic salt |
| Onion Powder 🧅 | ½ tsp | For subtle depth |
| All-Purpose Flour 🌾 | ¼ cup | For filling stability |
The Bisquick is the star here—original flavor only. Kroger or Walmart usually stock it at the best prices, and it's worth grabbing the biggest box you can find. The butter needs to be cold for that perfect flaky crust, so pull it straight from the fridge and cube it yourself (those pre-cubed packs work, but fresh cubes make all the difference). Sharp cheddar is non-negotiable—Kraft or Cabot are reliable brands, but if you've got a favorite, use it. I always shred mine myself because pre-shredded cheese has anti-caking agents that make the quiche taste weird. For the eggs, room temperature is key—they blend smoother and create that signature custardy texture.
No Bisquick? Substitute 1.5 cups all-purpose flour plus 2 tbsp baking powder—it won't be identical, but it'll work in a pinch. Heavy cream too pricey? Half-and-half or whole milk will work, but the texture won't be quite as rich. The milk should be warmed slightly (just microwave for 20 seconds) so it blends better with the eggs. For extra flavor, add 1/2 tsp mustard powder to the filling. The garlic and onion powders can be swapped for 1/4 tsp each of fresh minced garlic and onion if you're feeling fancy. And if you're short on time, pre-shredded cheese works—just don't expect that perfect pull-apart texture.
This quiche keeps beautifully—4 days in the fridge or 3 months in the freezer. Wrap it tightly in foil before freezing, and thaw overnight in the fridge. It reheats perfectly in the oven at 325°F for 15 minutes. I always make a double batch because it disappears fast—leftovers make great lunches. For serving, I like to sprinkle extra shredded cheese on top right before baking. That crispy cheese crust is worth the extra minute.
Why You'll Love This Recipe
- No-Pie-Crust Struggle: I swear by this hack—no rolling dough, no messy crust edges. Just press Bisquick into a pan, bake until golden, and suddenly you’ve got a flaky, buttery base that holds up like a dream. (Yes, even when my kids "help" stab it with a fork.)
- Sharp Cheese Magic: That sharp white cheddar? It’s the star. The way it melts into the creamy egg mixture—smooth one second, slightly gooey the next—makes every bite feel like a hug. Honestly, I’ve tried pre-shredded, but grating my own makes all the difference.
- Breakfast or Brunch Fix: Serve it warm with a side of fruit for a lazy weekend brunch, or pack slices for lunch the next day. The heavy cream keeps it rich enough to satisfy, but the Bisquick crust adds that comforting, homey touch that turns it into a crowd-pleaser every time.
- Leftovers That Don’t Suffer: Most quiches get rubbery when reheated, but this one? Still creamy and delicious the next day. I’ll be real—I’ve eaten cold slices straight from the fridge, and they’re just as good. Plus, the cheese stretches the budget without sacrificing flavor. Win.
Step-by-step instructions for Bisquick cheese quiche recipe
This quiche comes together faster than you'd think—crispy crust and creamy filling in one pan.
Prepare the Crust Mixture
In a large bowl, combine the 1.5 cups Bisquick Baking Mix, 0.5 cup cold cubed unsalted butter, and 0.25 cup all-purpose flour. The butter should be cold but not frozen—this ensures a flaky crust. Use your fingers or a fork to work the butter into the dry ingredients until you reach a crumbly texture with pea-sized butter pieces still visible. This creates pockets of steam during baking for that perfect flaky layer.
Here's the thing—don't overwork the mixture. You want it to hold together when pressed, but it shouldn't become sticky. If it feels too dry, add just 1 tablespoon whole milk to help it come together. The crust needs to be firm enough to hold its shape when you press it into the pie dish, but not so dense that it becomes tough.
Press the Crust and Pre-Bake
Transfer the crust mixture to a 9-inch pie dish and press it evenly against the bottom and up the sides, creating a ¼-inch thick crust. I like to use my fingers first to shape it, then press down firmly with the bottom of a measuring cup to ensure even thickness. The edges should be slightly thicker than the center—this prevents a soggy bottom later.
Preheat your oven to 375°F while you prepare the filling. Place the uncooked crust in the oven and bake for 10-12 minutes until it's light golden brown. This pre-baking step, called blind baking, prevents a soggy crust when the filling goes in. I know it seems like an extra step, but trust me—it makes all the difference in texture.
Mix the Filling Ingredients
In a medium bowl, whisk together the 6 whole large eggs, 0.5 cup heavy cream, and 0.25 cup whole milk until just combined—no need to overbeat. Add the 1.5 cups shredded sharp white cheddar cheese, 0.5 tsp salt, 0.25 tsp black pepper, 0.5 tsp garlic powder, and 0.5 tsp onion powder. Stir until the cheese is fully melted and the mixture is smooth. This warm filling will create that signature velvety texture we're after.
Here's where it gets fun—the cheese should be fully incorporated, but don't worry if you see a few tiny lumps. The heat from the oven will finish melting them. I always warm the milk slightly first (just a few seconds in the microwave) to help the cheese blend more smoothly. The filling should be thick but pourable—if it looks too thick, add 1 tablespoon whole milk to help it flow evenly into the crust.
Assemble and Bake to Perfection
Pour the cheese filling into the pre-baked crust, spreading it evenly with a spatula. The filling should come about ½ inch below the top edge of the crust—this prevents overflow during baking. Place the quiche on the middle rack of your oven (preheated to 375°F) and bake for 35-40 minutes until the filling is set and golden brown on top.
You'll know it's done when the center no longer jiggles and the top has a beautiful golden crust. The cheese should be fully melted with no liquid pooling on top. If you're worried about the top browning too quickly, tent it loosely with aluminum foil after 20 minutes of baking. Let the quiche rest for 10 minutes before slicing—this allows the filling to set completely and makes it easier to serve without crumbling.
Serve Warm with Fresh Herbs
Slice the quiche into 6 equal wedges using a sharp knife. The filling should be creamy with just a hint of firmness in the center—this means it's perfectly cooked. I like to garnish each slice with a sprinkle of freshly cracked black pepper and a few chopped chives (if you have them) for that restaurant-quality touch.
Serve immediately while still warm. The contrast between the crispy, golden crust and the velvety cheese filling is what makes this quiche so special. Each bite delivers that perfect balance of textures and flavors. Leftovers? Store them in the fridge for up to 3 days and reheat in the oven at 350°F for 10-15 minutes to restore that crispy crust.
Pro Tips For Making Bisquick Cheese Quiche
- Preheat Like It’s 1985: Crank that oven to 425°F and give it 15 minutes to scream-hot before baking. I learned this the hard way—lukewarm pans mean a doughy crust that soaks up filling instead of staying crisp. Trust me, your quiche will thank you.
- Grate That Cheese: Skip the chunks—fine-grate the cheddar so it melts evenly into the custard. I used to toss in pre-shredded cheese (ugh, anti-caking agents), and the result was a sad, clumpy mess. Freshly grated? Creamy perfection every time.
- Whisk the Eggs Cold: Whisk the eggs and cream straight from the fridge—no warm-up needed. I used to let them sit out, and the custard would turn rubbery. Cold ingredients blend smoother and set up better, even if it feels counterintuitive.
- Butter the Pan First: Slather the bottom and sides of your pie dish with melted butter before pressing in the Bisquick crust. This isn’t just for flavor—it keeps the crust from sticking like glue. (Yes, even if you’re using a nonstick pan.)
Creative variations of this bisquick cheese quiche
Spinach & Feta Twist
Swap half the cheddar for 1 cup chopped fresh spinach (sautéed with 1 minced garlic clove for 2 minutes until wilted) and fold it into the egg mixture. Top with ½ cup crumbled feta cheese before baking.
The spinach adds a subtle earthiness that pairs beautifully with the creamy filling. I like to use baby spinach for a more delicate flavor, but regular spinach works too. 🥬
Spicy Jalapeño Kick
Add 1 diced jalapeño (seeds removed for mild heat) and ½ tsp smoked paprika to the filling for a smoky, spicy variation. For extra heat, sprinkle ½ tsp cayenne pepper over the crust before baking.
The jalapeños caramelize slightly, giving each bite a subtle charred flavor. Serve with cool ranch or Greek yogurt dip on the side to balance the heat. 🌶️
Breakfast Meat Lover's
Cook ½ lb cooked breakfast sausage (like Johnsonville Original) or crispy bacon until fully done, then crumble it into the filling. For extra richness, stir in ¼ cup sour cream with the eggs.
The meat adds a hearty, savory depth that makes this quiche perfect for brunch or a quick lunch. I often use applewood-smoked bacon for a sweeter, smokier flavor. 🥓
Herb-Infused Garden
Stir 2 tbsp chopped fresh chives, 1 tbsp chopped fresh dill, and 1 tbsp chopped fresh parsley into the filling for a bright, herbaceous twist. The fresh herbs add a pop of color and a fresh, slightly bitter contrast to the rich cheese.
I like to garnish the top with extra herbs before serving for that restaurant-quality presentation. 🌿
Sweet & Savory Caramelized
For a unique twist, sprinkle ½ cup caramelized onions (sautéed with 1 tbsp brown sugar until golden) over the filling before baking. The sweetness of the onions balances the sharp cheddar beautifully.
I also add ½ tsp cinnamon to the filling for a subtle warmth that complements the caramelized onions perfectly. 🍯
Gluten-Free Adaptation
Replace the Bisquick crust with a gluten-free pie crust mix (like Pillsbury GF) and use 1.5 cups gluten-free all-purpose flour in the filling. The texture will be slightly denser, but still delicious.
For extra flavor, add 1 tbsp nutritional yeast to the filling—it adds a cheesy, umami depth without gluten. This version keeps all the richness while being safe for gluten-sensitive guests. 💛
Nutrition facts
Frequently asked questions
Can I make this quiche ahead of time?
This quiche actually tastes better the next day. Bake it fresh, let it cool completely, then wrap tightly in plastic wrap. Store in the fridge for up to 4 days or freeze for 3 months. To reheat, warm at 350°F for 10-15 minutes until the crust is crispy again. The flavors meld beautifully overnight.
Why does my Bisquick crust turn out dense instead of flaky?
The key is keeping the butter cold and working it in just until crumbly. Overmixing develops gluten, which makes the crust tough. Also ensure your oven is fully preheated to 375°F—a cool oven prevents proper steam pockets for flakiness. Press the crust evenly and don't skip the 10-minute pre-bake step.
What's the best cheese substitute if I don't have sharp cheddar?
Monterey Jack or Gouda work beautifully for a milder flavor. For extra richness, try a blend of ½ cup cheddar + ½ cup Gruyère. Avoid pre-shredded cheese (it has anti-caking agents that make the quiche taste artificial). If you're out of cheese entirely, ½ cup cream cheese blended into the filling adds creaminess.
Can I make this quiche in a different size pan?
Yes, but adjust the baking time. A 9-inch pan bakes in 35-40 minutes, while an 8-inch pan will need 40-45 minutes and a 10-inch pan will take 30-35 minutes. The filling should be about ½ inch below the pan's edge to prevent overflow. For deeper pans, reduce the filling depth to ¼ inch below the rim.
How do I prevent the filling from getting watery?
Use room-temperature eggs and warm the milk slightly before mixing. The cheese should be fully melted in the filling—if it looks too thick, add 1 tablespoon milk. Also ensure your oven is fully preheated and don't open the oven door during the first 20 minutes of baking, which can cause the filling to sink.