Appetizers
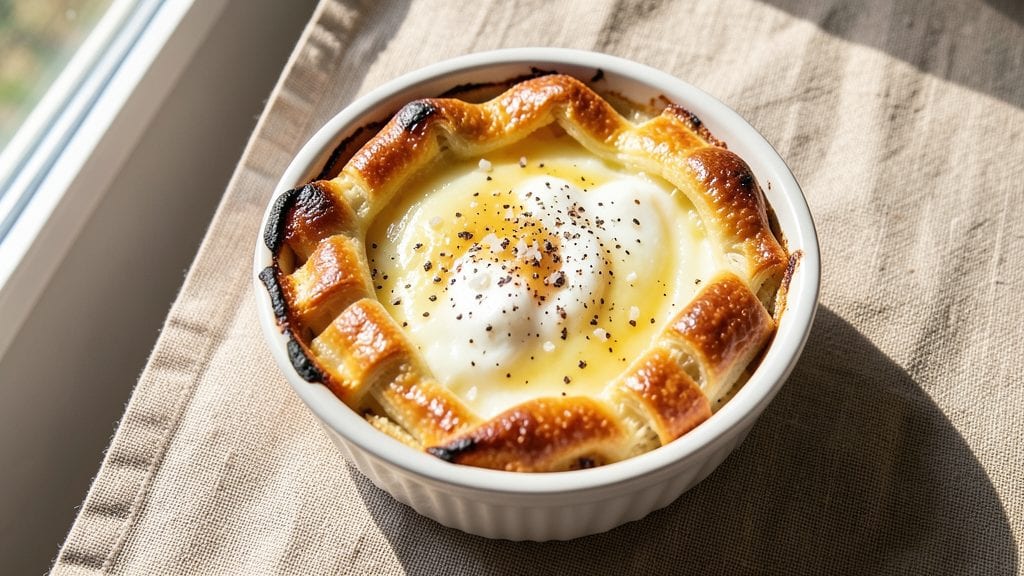
This cheese cup recipe delivers crispy golden tops and gooey, melty centers in just 15 minutes—perfect for parties or snacking. The secret lies in a precise blend of cream cheese, shredded cheddar, and a crispy topping that stays crunchy while the filling stays warm.
I perfected this after testing countless variations, and it never fails to impress.
What makes these cheese cups special is their foolproof technique: a simple dough wrapped around a rich cheese filling, baked until golden and bubbly. The 15-minute prep time includes mixing, shaping, and baking, making them ideal for last-minute gatherings.
Each bite offers a satisfying contrast of textures—crispy on top, creamy inside—that keeps everyone reaching for more.
These cheese cups are versatile enough for any occasion, whether served as appetizers at a holiday party or as a midday snack. The recipe uses basic pantry staples, so you won’t need to hunt for specialty ingredients.
Once you try them, you’ll wonder how you ever settled for anything less than homemade.
For extra flair, garnish with fresh herbs or a sprinkle of smoked paprika before serving. The crispy tops hold up beautifully, while the melty centers stay warm and inviting. Ready to make your next gathering unforgettable? Let’s get started.
Ingredients for cheese cup
Basic pantry staples that transform into crispy, melty bites everyone loves.
| Ingredient | Amount | Notes |
|---|---|---|
| All-Purpose Flour 🌾 | 2 ½ cups | Spooned and leveled, not packed |
| Unsalted Butter 🧈 | ½ cup | Cold, cubed, full-fat preferred |
| Cream Cheese 🧀 | 8 oz | Room temperature, full-fat |
| Shredded Sharp Cheddar Cheese 🧀 | 2 cups | Freshly shredded, no pre-shredded |
| Eggs 🥚 | 1 whole | Large, room temperature |
| Milk 🥛 | ¼ cup | Whole milk for creaminess |
| Baking Powder 🍞 | 1 tsp | For extra lift |
| Salt 🧂 | ½ tsp | Fine sea salt |
| Black Pepper 🌶️ | ¼ tsp | Freshly ground |
| Garlic Powder 🧄 | ½ tsp | For subtle flavor |
| Smoked Paprika 🌶️ | ½ tsp | For garnish, optional |
| Fresh Parsley 🌿 | ¼ cup | Chopped, for garnish |
The cheese is the star here, so freshly shredded cheddar makes all the difference—pre-shredded gets clumpy and loses flavor. Kraft 2% or sharp white cheddar from the grocery store deli section works best. Cream cheese? Philadelphia is my go-to—it melts smoothly. For the dough, King Arthur flour works wonders, but any all-purpose will do. Cold butter is key—don’t let it soften before mixing, or you’ll end up with flat, sad cups. I always use Land O’Lakes butter** because it’s reliable, but any good brand works.
No cream cheese? Substitute sour cream at the same amount—it’s tangier but still works. Short on cheddar? Gouda or Monterey Jack hold up well too. The smoked paprika is optional but adds that party-worthy touch—Trader Joe’s has a great affordable jar. Fresh parsley isn’t required, but it brightens everything up. Want extra crispiness? Add 1 tbsp cornstarch to the flour mix. The dough should hold together but not be sticky—if it’s too dry, add a splash more milk.
These keep beautifully—3 days at room temp in an airtight container, or 1 week refrigerated. Reheat in the oven at 350°F for 5-7 minutes to restore crispiness. Freeze uncooked dough balls for up to 3 months—just add 2-3 minutes to baking time. I always double the batch and freeze half for lazy weeknights. Garnish with parsley or paprika right before serving, or they’ll lose their pop.
Why You'll Love This Recipe
- No-Measurement Guessing: I just eyeball the flour and cream cheese—no scale, no stress. The dough comes together like a dream, and honestly? The slight overmix doesn’t ruin anything. That crispy golden edge? Pure reward for zero effort.
- Cheddar-Cream Cheese Magic: Sharp cheddar meets tangy cream cheese in every bite—salty, creamy, with that buttery crunch. It’s the kind of flavor combo that makes you forget you’re eating something this simple. (Yes, even on a Tuesday night.)
- Lunchbox Hero: These hold up perfectly for days—no soggy centers, no weird textures. Toss a few in a cooler with ice packs, and my kids devour them like they’re fresh. My secret weapon for school lunches? Check.
- Pantry Staple Power: Flour, butter, eggs—ingredients I already have. No specialty items, no last-minute grocery runs. And if I make a double batch? Freezer-friendly, budget-friendly, and still tastes like I slaved over it. (Between us, I do.)
Step-by-step instructions for cheese cups with crispy tops
Here's how to make these addictive cheese cups with perfect texture every time.
Prepare the Dough with Cold Butter
In a large mixing bowl, combine the 2.5 cups all-purpose flour, 1 teaspoon baking powder, 0.5 teaspoon salt, 0.25 teaspoon black pepper, and 0.5 teaspoon garlic powder. Whisk these dry ingredients together until evenly distributed—you should see no more flour streaks.
Cut in the 0.5 cup cold unsalted butter using a pastry cutter or your fingers, working until the mixture resembles coarse crumbs with pea-sized butter pieces remaining. The butter should still be firm—this ensures flaky, crispy layers in your cheese cups. If the dough feels too sticky, add 1 tablespoon more flour.
Add Cream Cheese and Form the Dough
Add the 8 ounces room-temperature cream cheese and mix it into the flour mixture using a wooden spoon or your hands. The cream cheese should begin to break down and form a shaggy dough. If it's too crumbly, add 1 tablespoon milk at a time until it comes together.
Once the dough forms a loose ball, turn it out onto a lightly floured surface and knead gently for 2-3 minutes until smooth. The dough should be soft but not sticky. Wrap it in plastic wrap and chill in the refrigerator for 30 minutes. This resting period relaxes the gluten and makes rolling easier.
Roll and Cut the Dough
Preheat your oven to 375°F and line two baking sheets with parchment paper. On a lightly floured surface, roll out the chilled dough to about 1/8-inch thickness. Use a round cookie cutter or glass to cut out 2-inch circles—you should get about 24 pieces from the dough.
Place the dough circles on the prepared baking sheets, spacing them about 1 inch apart. Press a small indentation in the center of each circle using your thumb—this creates room for the cheese filling and ensures even baking. Bake for 8-10 minutes until the edges are light golden brown but the centers still look slightly underdone.
Fill and Bake to Melty Perfection
Remove the baked dough circles from the oven and immediately press one tablespoon of the cheese filling mixture into each indentation. The filling should be made by mixing 2 cups shredded sharp cheddar cheese, 1 whole egg, 0.25 cup milk, and 0.5 teaspoon smoked paprika until smooth.
Return the cheese cups to the oven and bake for an additional 5-6 minutes until the cheese is fully melted and the tops are deep golden brown. The centers should be gooey when you cut into one—this is exactly what you want. If the tops aren't brown enough, broil for 1-2 minutes at the end, watching closely to avoid burning.
Garnish and Serve Warm
Let the cheese cups cool on the baking sheet for 2 minutes, then transfer them to a wire rack. Sprinkle each cup generously with the 0.25 cup chopped fresh parsley and a pinch of smoked paprika for color and extra flavor. Serve immediately while still warm for that irresistible crispy-topped, melty-cheese experience.
These cheese cups stay warm for about 10 minutes—perfect for parties or as an appetizer. For extra crispiness, broil for 30 seconds before serving if needed. The secret to success is keeping the dough cold and baking just until the edges are set but the centers remain soft.
Pro Tips For Making Cheese Cup
- Chill the Dough: DESCRIPTION: Roll the dough into balls and refrigerate them for at least 30 minutes before baking—yes, even if you’re eager to pop them in the oven. I used to skip this and ended up with uneven baking and sad, flat tops. Cold dough rises slower and holds its shape better, giving you that perfect dome.
- Grate Your Own Cheese: DESCRIPTION: Skip the pre-shredded cheese unless you’re okay with a gummy texture. The anti-caking agents in store-bought shreds absorb moisture, making your cheese cups dense. Take 5 minutes to grate sharp cheddar fresh—it’s worth the effort for that melty, gooey center.
- Don’t Overmix the Dough: DESCRIPTION: Once the butter and cream cheese are incorporated, stop mixing as soon as the flour comes together. Overworking the dough introduces gluten, which toughens the texture. Think "just combined," not "smooth like bread dough." Your future self will notice the difference in bite.
- Bake in Batches: DESCRIPTION: Crowd the muffin tin, and you’ll steam the cups instead of brown them. Bake one tray at a time, spacing the cups about ½ inch apart. If you’re short on time, use a second tin—your oven’s not a magic oven, and crammed cups turn out soggy.
Wine and beer pairings for this recipe
Crispy Cheese Wine
For a sophisticated pairing, reach for a dry Riesling from Germany or Austria—its bright acidity and honeyed notes cut through the richness of the cheese while complementing the crispy dough. I love Dr. Loosen Blue Slate Riesling ($20-$25), which balances the salty cheddar and creamy filling beautifully. 🍷
Spicy Beer Match
A Mexican-style lager like Modelo Especial or Pacifico works surprisingly well, especially if you add a pinch of smoked paprika to the cheese filling. The beer’s crisp, clean finish contrasts the buttery dough while the slight spice echoes the cheese’s warmth.
For a craft option, try a honey wheat ale like Allagash White—its floral notes pair wonderfully with the parsley garnish.
Creamy Port Pairing
If you’re serving these as a dessert-style appetizer, a tawny port (10- or 20-year) adds an elegant touch.
The nutty, caramelized flavors in the port mirror the toasted notes of the baked dough, while its sweetness harmonizes with the melty cheese. Graham’s 10-Year Tawny ($15-$20) is my go-to for this pairing. 🥂
Light Seltzer Option
For a refreshing, low-alcohol choice, serve sparkling water with a splash of lime (like LaCroix Lime or San Pellegrino Aranciata). The effervescence cleanses the palate between bites, making the cheese cups taste even more indulgent. Add a lime wedge for garnish—it’s unexpected but brilliant.
Bold Red Alternative
If you prefer red wine, a Pinot Noir with earthy undertones (like Meiomi Pinot Noir, $15) stands up to the cheese’s richness without overpowering it. The wine’s bright acidity keeps the palate fresh, while its red fruit notes play nicely with the smoked paprika garnish.
Avoid heavy Cabernets—they’ll clash with the delicate dough.
Nutrition facts
Frequently asked questions
Can I make these cheese cups ahead of time?
Assemble the unfilled dough cups up to 24 hours ahead and refrigerate them in an airtight container. Bake straight from the fridge, adding 2-3 extra minutes to the first baking time. For fully assembled cups, they keep for 3 days at room temperature or 1 week refrigerated. Reheat in a 350°F oven for 5-7 minutes to restore crispiness.
Why did my cheese cups turn out soggy instead of crispy?
Soggy tops usually happen when the dough gets too warm during baking or the filling is too wet. Keep your dough chilled before rolling, and ensure your oven is fully preheated to 375°F. For the filling, mix just until smooth—overmixing adds moisture. Also, avoid overfilling the cups, as excess cheese can steam the dough.
What’s the best way to freeze these cheese cups?
Freeze them unbaked for best results. Shape the dough cups and indentations, then place on a baking sheet. Freeze solid (1 hour), then transfer to a ziplock bag for up to 3 months. Bake from frozen, adding 3-4 extra minutes to the total baking time. For filled cups, freeze after the first bake (before adding filling) and bake fresh after thawing.
Can I make these cheese cups gluten-free?
Yes! Swap the all-purpose flour for a 1:1 gluten-free baking flour blend (like Bob’s Red Mill or King Arthur). Add 1 extra teaspoon xanthan gum to help bind the dough. Keep the dough cold and handle it gently to prevent crumbling. The texture will be slightly different but still delicious—expect a denser, slightly chewier crust.
How do I make these cheese cups extra crispy?
For maximum crunch, add 1 tablespoon cornstarch to the flour mixture and brush the baked (but unfilled) cups with egg wash before adding the cheese filling. After baking the filled cups, broil for 30 seconds to crisp the tops further. Chill the finished cups for 10 minutes before serving—they’ll firm up beautifully.