Soups & Stews
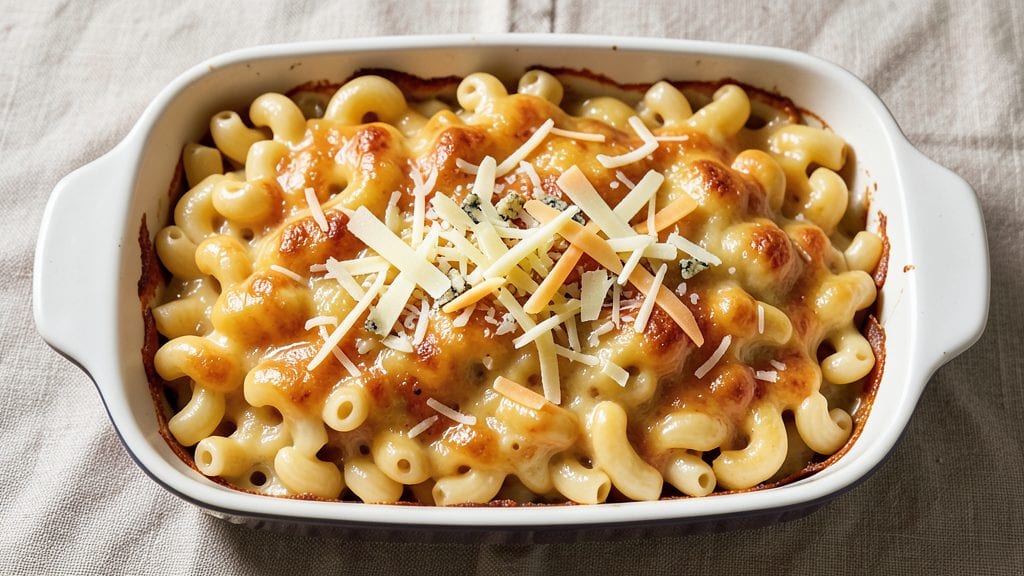
Martha Stewart's baked macaroni and cheese delivers that perfect combination of crispy golden top and creamy, melty cheese layers—just like the iconic version we all know and love. This recipe captures Martha's signature attention to detail, from the precise cheese blend to the foolproof baking technique that ensures every bite is rich, tender, and satisfying. The secret lies in the slow-cooked cheese sauce and the crispy breadcrumb topping that transforms this dish into a showstopper.
What makes this recipe truly special is its balance of simplicity and sophistication. With just a handful of ingredients and a straightforward process, you'll achieve restaurant-quality results that are perfect for family dinners or special occasions.
The key is patience—letting the cheese sauce develop its velvety texture before baking, and toasting the breadcrumbs to a perfect golden brown for that irresistible crunch. It's the kind of dish that feels indulgent yet comes together effortlessly.
By the time you pull this macaroni and cheese from the oven, you'll have a bubbling, golden masterpiece with a crispy top that shatters slightly and a creamy interior that melts in your mouth.
The aroma alone will have everyone gathering around the table, and the first bite will confirm why this recipe has stood the test of time. This is comfort food at its finest, elevated to something truly memorable.
Serve it as a main dish with a crisp green salad or roasted vegetables, or offer it as a side that steals the show at any meal.
The beauty of this recipe is its versatility—it's perfect for weeknight dinners or holiday gatherings, always delivering that perfect balance of texture and flavor. Let's get started on creating your own Martha Stewart-worthy masterpiece.
Ingredients for martha stewart baked macaroni and cheese
Crispy top, melty layers—this is the Martha Stewart magic you'll taste in every bite.
| Ingredient | Amount | Notes |
|---|---|---|
| Elbow Macaroni 🍝 | 12 oz | Uncooked, medium or fine elbow |
| Unsalted Butter 🧈 | ½ cup | Full-fat, cut into small pieces |
| All-Purpose Flour 🌾 | ¼ cup | For roux, sifted preferred |
| Sharp White Cheddar Cheese 🧀 | 2 cups | Freshly grated, block preferred |
| Medium Cheddar Cheese 🧀 | 1 ½ cups | Freshly grated, block preferred |
| Gruyère Cheese 🧀 | 1 cup | Freshly grated, nutty flavor |
| Whole Milk 🥛 | 2 cups | Full-fat for creaminess |
| Yellow Mustard 🍯 | 1 tbsp | Dijon or prepared, tangy kick |
| Kosher Salt 🧂 | 1 ½ tsp | Adjust to taste, don't skip |
| Freshly Ground Black Pepper 🌶️ | ½ tsp | Freshly cracked for best flavor |
| Panko Breadcrumbs 🍞 | ½ cup | For crispy topping, toasted |
| Extra-Virgin Olive Oil 🫒 | 2 tbsp | For topping, fruity variety |
| Garlic Powder 🧄 | ½ tsp | For topping, aromatic boost |
The cheese blend is non-negotiable. Grab a wedge of sharp cheddar and Gruyère from the deli counter—pre-shredded gets clumpy and loses flavor fast. I always buy Cabot or Tillamook cheddar for that signature tang. Gruyère adds nutty depth, and you can find it at Whole Foods or specialty cheese shops. For the macaroni, Barilla or De Cecco are my go-tos—they hold up best during baking. And trust me, panko breadcrumbs toasted with olive oil and garlic powder make all the difference for that golden, shatteringly crisp top.
No Gruyère? Add an extra cup of sharp cheddar and a splash of cream to mimic the richness. Running low on panko? Toast regular breadcrumbs with olive oil until crispy—they'll work in a pinch. The mustard is key here; Dijon or prepared both work, but don't skip it—it balances the richness. For a vegan twist, swap the cheddar for nutritional yeast and cashew cheese, though the texture won't be identical. And if your roux gets too thick, add a splash of milk gradually—it's better to have it too thin than too thick.
This dish reheats beautifully—just 350°F for 15 minutes covered with foil. The leftovers? 5 days in the fridge, but honestly, it's gone by day 2. For meal prep, assemble the dish ahead but skip the topping until baking—that way, it stays crispy. Freeze portions without the topping for up to 3 months—just add fresh breadcrumbs and bake when ready. And if you're making this for a crowd, double the recipe—it's that good.
Why You'll Love This Recipe
- No-Fuss Baking: I swear, this recipe doesn’t require a baker’s precision—just toss the elbow macaroni into a buttered dish, blanket it with that golden roux, and bake. The flour-butter base creates a silky sauce that clings to every noodle without a struggle.
- Sharp Cheese Magic: That mix of sharp white cheddar and medium cheddar? It’s the secret weapon. The sharp one adds a bright, tangy kick while the medium keeps it creamy—no weirdly grainy texture here. The cheese melts into a velvety layer that makes every bite worth it.
- Weeknight Crowd-Pleaser: Honestly, this feeds six without breaking the bank or my patience. My college-age son devours it cold the next day, and my picky mom-in-law still asks for seconds. It’s the kind of dish that disappears fast but doesn’t demand fancy prep.
- Leftovers That Lie: Between us, the best part is how it tastes even better reheated. I make a double batch on Sundays, and by Wednesday, no one remembers it’s “leftovers”—just “that amazing mac and cheese.” Plus, the cheddar stretch means fewer trips to the grocery store.
Step-by-step instructions for Martha Stewart's baked macaroni and cheese
Here's how to create that legendary crispy top and creamy, melty center—every time.
Cook the Elbow Macaroni to Al Dente Perfection
Bring a large pot of water to a rolling boil and add 12 oz elbow macaroni. Stir immediately to prevent sticking. Cook for 10-11 minutes until the pasta is al dente—you should still feel a slight resistance when biting into it. Drain the pasta in a colander and rinse briefly with cool water to stop the cooking process. Shake the colander gently to remove excess water, but don't let it dry out completely.
I like to reserve 1 cup of the pasta water before draining. This starchy water is liquid gold for creating a silky sauce later. Keep it nearby—you'll need it to adjust the consistency of your cheese mixture. The pasta should be hot when you mix it with the cheese, so work quickly once you drain it.
Make the Ultimate Cheese Sauce
In a large, heavy-bottomed pot, melt 0.5 cup unsalted butter over medium heat until it's completely liquid. Add 0.25 cup all-purpose flour all at once and whisk vigorously for 2-3 minutes until you have a smooth, pale roux. This step is crucial—don't rush it, or you'll end up with a floury taste instead of that rich, creamy base.
Slowly pour in 2 cups whole milk, whisking constantly to prevent lumps from forming. Bring the mixture to a gentle simmer and cook for 5 minutes, stirring frequently. Remove the pot from heat and stir in 2 cups sharp white cheddar cheese, 1.5 cups medium cheddar cheese, and 1 cup gruyère cheese until completely melted and smooth. The sauce should be thick enough to coat the back of a spoon but still pourable.
Combine Pasta and Cheese Mixture
Add the drained elbow macaroni to the cheese sauce and stir gently to coat each piece evenly. The pasta should be fully coated with the cheese mixture, but don't overmix—you want some texture to remain. Stir in 1 tbsp yellow mustard, 1.5 tsp kosher salt, and 0.5 tsp freshly ground black pepper. Taste and adjust the seasoning if needed, keeping in mind the salt from the cheddar cheeses.
Here's the thing—this is where the magic happens. The mustard adds a subtle tang that balances the richness of the cheeses, and the freshly cracked pepper gives it a little bite. If the mixture seems too thick, add 2-3 tablespoons of the reserved pasta water to loosen it. You want it to be smooth enough to layer beautifully but still hold its shape when baked.
Assemble and Bake for the Perfect Crispy Top
Preheat your oven to 375°F. Transfer the macaroni and cheese mixture to a 9x13-inch baking dish and spread it out evenly. In a small bowl, combine 0.5 cup panko breadcrumbs, 2 tbsp extra-virgin olive oil, 0.5 tsp garlic powder, and an additional 0.25 tsp kosher salt. Sprinkle this mixture evenly over the top of the macaroni and cheese, pressing down gently with your fingers to help it adhere.
Bake for 25-30 minutes until the top is deep golden brown and the edges are bubbling. The center should still be slightly jiggly—this indicates it's perfectly melted but not overcooked. If the top isn't browning enough, broil for 1-2 minutes at the end, watching closely to avoid burning. The contrast between the crispy top and creamy interior is what makes this dish legendary.
Rest and Serve with Confidence
Remove the baking dish from the oven and let it rest for 5-10 minutes before serving. This resting period allows the cheese to set slightly, making it easier to slice and serve. The dish will be hot, so use oven mitts or a thick towel to handle the baking dish.
Slice into 6 generous portions and serve immediately. Each bite should deliver that perfect combination of crispy, golden-brown topping and creamy, melty cheese layers. The sharp white cheddar adds brightness, the medium cheddar brings richness, and the gruyère contributes a nutty depth that ties everything together. Trust the process—this is Martha Stewart's signature technique, and it never fails to impress!
Pro Tips For Making Martha Stewart Baked Macaroni And Cheese
- Cook pasta al dente: DESCRIPTION: Martha’s recipe calls for elbow macaroni, but don’t overcook it—pull it when it’s still firm to the bite (about 1 minute less than package instructions). The starch in slightly undercooked pasta binds better with the cheese sauce later, and it holds up better during baking. I learned this the hard way after a gummy, sad mac and cheese disaster.
- Grate cheese finely: DESCRIPTION: Skip the food processor for the sharp white cheddar—hand-grate it over a bowl for small, even shreds. Large chunks melt unevenly and create a grainy texture. If you’re lazy (like me), at least break the cheese into rough pieces before grating so the blade does less work.
- Whisk roux until thick: DESCRIPTION: The butter-flour roux is where flavor happens—don’t rush it. Cook it over medium heat, stirring constantly, until it’s a deep golden brown (about 3-4 minutes). If it smells nutty, you’re on track. A pale roux tastes bland, and rushing it makes the sauce taste raw.
- Press cheese into pasta: DESCRIPTION: After mixing the sauce with the pasta, press a handful of grated cheese into the top before baking. This locks in moisture and guarantees a gooey, melty crust. I was skeptical until I tried it—now it’s non-negotiable for me.
Pro cooking tips for martha stewart baked macaroni and cheese
Roux Perfection
The secret to Martha's signature creamy texture starts with a flawless roux. Melt ½ cup unsalted butter over medium heat until it foams, then whisk in ¼ cup all-purpose flour all at once. Cook for exactly 2-3 minutes until it's a pale golden color—this is critical.
A dark roux will add a floury taste, while an undercooked one won't emulsify properly. I use a wire whisk and stir constantly to prevent lumps. 🌡️
Cheese Melting Mastery
When adding the cheeses, remove the sauce from heat first—this prevents scorching and ensures smooth melting. Start with the sharp cheddar, then add the medium cheddar and gruyère gradually while stirring vigorously. If you see any unmelted cheese clumps, add 1-2 tablespoons of reserved pasta water to help emulsify.
The sauce should coat the back of a spoon but still be pourable. I like to let it sit off heat for 2-3 minutes before combining with pasta to maximize creaminess.
Pasta Water Gold
Never skip reserving that pasta water—it's the secret weapon for adjusting consistency. The starch in the water acts as a natural thickener and helps create that velvety texture.
If your sauce looks too thick after combining with pasta, add 1-2 tablespoons of pasta water at a time until it reaches a smooth, spoonable consistency. I usually need about ¼ cup total to get it just right.
This step makes all the difference between a dry casserole and a luscious baked mac and cheese.
Baking Dish Prep
Grease your 9x13-inch baking dish with butter or olive oil before adding the mac and cheese mixture. I like to use a pastry brush to coat the bottom and sides thoroughly—this prevents sticking and makes cleanup a breeze.
For extra insurance, I even sprinkle a light layer of panko breadcrumbs on the bottom before adding the cheese mixture. This creates a barrier that keeps the dish from sticking to the pan, especially when you're dealing with all that melted cheese.
Crispy Top Secrets
The golden, shatteringly crisp topping is what makes this dish legendary. Mix your panko breadcrumbs with olive oil and garlic powder before sprinkling on top—this ensures even distribution and maximum crispiness. Press down gently with your fingers to help them adhere, then bake until deep golden brown.
For extra insurance, broil for 1-2 minutes at the end if needed, but watch closely to avoid burning. The contrast between that crispy top and creamy interior is what makes this Martha Stewart classic so irresistible. 💫
Resting Matters
This is one step that's often overlooked but makes a huge difference. Let your baked mac and cheese rest for 5-10 minutes before serving. This allows the cheese to set slightly and redistribute its moisture, resulting in cleaner slices and better texture.
The dish will be hot, so use oven mitts or a thick towel when handling the baking dish. Patience here pays off—it's the difference between a messy, runny dish and one that holds its shape beautifully on the plate.
Nutrition facts
Frequently asked questions
Can I make this baked mac and cheese ahead of time?
Assemble the dish (without the breadcrumb topping) up to 24 hours ahead and refrigerate. When ready to bake, add the topping and bake at 375°F for 25-30 minutes. For make-ahead freezing, assemble without the topping, wrap tightly in foil, and freeze for up to 3 months. Thaw overnight in the fridge, add fresh breadcrumbs, and bake as directed.
What's the best way to reheat leftovers?
Cover with foil and reheat at 350°F for 15-20 minutes until warmed through. For a crispy top, broil for 1-2 minutes at the end. Microwaving works in a pinch (covered for 1-2 minutes), but it won't restore that perfect crispy texture. The key is low-and-slow heat to prevent drying out the creamy layers.
Can I substitute any of the cheeses?
Gruyère is ideal for its nutty depth, but you can swap it for Parmesan (½ cup) + extra cheddar (½ cup) if needed. Avoid pre-shredded cheese—it contains anti-caking agents that make the sauce grainy. For a vegan version, use nutritional yeast and cashew cheese, though the texture will differ. The mustard is non-negotiable—it balances the richness and adds subtle tang.
Why did my mac and cheese get watery after baking?
This usually happens when the sauce is too thin or the pasta wasn't drained well. Always reserve 1 cup pasta water and add it gradually to adjust consistency. Also, ensure your pasta is al dente (not mushy) before mixing. For extra insurance, let the assembled dish sit at room temperature for 10 minutes before baking to help the cheese set properly.
How do I make this dish kid-friendly?
Reduce the amount of mustard to ½ tbsp (or omit entirely) to soften the tang. Use mild cheddar instead of sharp and add a pinch of paprika for color instead of garlic powder. For picky eaters, serve with a side of buttered peas or steamed broccoli to balance the richness. The creamy texture is naturally appealing to kids—just keep the flavors gentle!