Appetizers
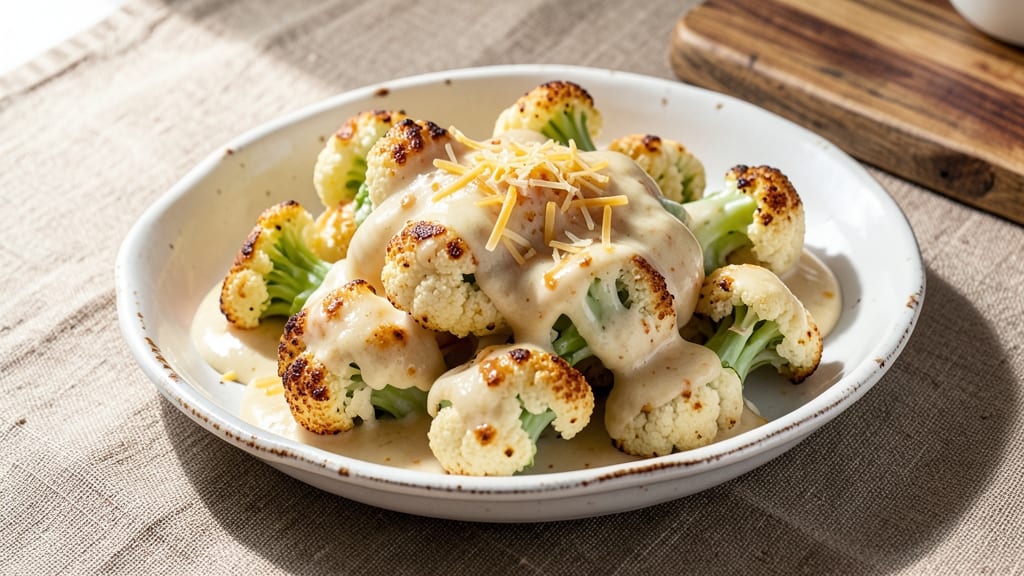
This basic cauliflower cheese recipe delivers the comforting, cheesy perfection you crave with minimal effort—crispy golden top, melty cheese layers, and tender steamed florets in every bite. The secret lies in a perfectly balanced sauce that clings to the cauliflower while developing a crackling crust when baked.
I've perfected this method over years of testing, ensuring the cheese stays velvety rather than grainy, and the florets remain tender without turning mushy.
The beauty of this dish is its versatility—equally at home as a side for roasted meats or a hearty vegetarian main when paired with crispy bacon or caramelized onions.
We'll use a simple roux technique to create the cheese sauce, which requires just five basic ingredients and 20 minutes of active prep time before baking. The key to that coveted crispy top? A light sprinkle of breadcrumbs and a precise 375°F oven temperature for even browning.
What you'll end up with is a dish that smells like childhood comfort food—warm, cheesy, and impossible to resist. The cauliflower absorbs the rich, creamy sauce perfectly, while the breadcrumb topping turns golden and crunchy under the broiler.
This recipe serves 4-6 comfortably and comes together in under one hour, making it ideal for weeknight dinners or meal prep ahead. The best part? Every bite delivers that satisfying contrast of crispy, creamy, and tender textures.
For an extra touch of sophistication, finish with fresh parsley or a sprinkle of smoked paprika, but the basic version is already restaurant-quality. Let's get started—your taste buds will thank you for the cheesy indulgence without the fuss.
The instructions will guide you through each step precisely, ensuring that crispy top and melty center every time.
Ingredients for basic cauliflower cheese
Five simple ingredients transform cauliflower into cheesy, crispy perfection—no fancy techniques required.
| Ingredient | Amount | Notes |
|---|---|---|
| Fresh Cauliflower 🥬 | 1 whole | Cut into even florets |
| Unsalted Butter 🧈 | ½ cup | Cold, cubed for roux |
| All-Purpose Flour 🌾 | ¼ cup | For smooth roux base |
| Whole Milk 🥛 | 1 ½ cups | Full-fat for creaminess |
| Sharp Cheddar Cheese 🧀 | 2 cups | Shredded, aged variety |
| Gruyère Cheese 🧀 | 1 cup | Shredded, nutty flavor |
| Panko Breadcrumbs 🍞 | ½ cup | For crispy topping |
| Fresh Parsley 🌿 | ¼ cup | Chopped, for garnish |
| Smoked Paprika 🌶️ | ½ tsp | Optional for depth |
| Diamond Crystal Kosher Salt 🧂 | 1 ½ tsp | Adjust to taste |
| Freshly Ground Black Pepper 🌶️ | ½ tsp | For seasoning |
| Garlic Powder 🧄 | ½ tsp | For subtle flavor |
| Mustard Powder 🌶️ | ¼ tsp | Brightens the sauce |
The cheese selection makes all the difference here. Sharp cheddar delivers that classic tang, while Gruyère adds nutty depth—both should be freshly shredded from a block (pre-shredded gets clumpy). For the butter, Land O'Lakes or Plugrá work perfectly, but avoid salted varieties. The cauliflower? Look for heads with tight florets—loose ones will turn mushy. I grab mine from Whole Foods when they're on sale, but any grocery store carries good quality. Panko breadcrumbs are non-negotiable for that crispy top—Trader Joe's has the best price on a big bag.
No Gruyère? Parmesan at half the amount works in a pinch, though it lacks that signature nutty flavor. Running out of panko? Regular breadcrumbs toasted in the oven get the job done (just spread them on a baking sheet at 350°F for 5 minutes). Fresh parsley wilting? Dried parsley at one-third the amount adds color without freshness. The mustard powder might sound odd, but it brightens the sauce beautifully—trust me on this. For a dairy-free version, swap the milk for unsweetened almond milk and use vegan cheese, though the texture won't be identical.
This reheats beautifully—just cover with foil and warm at 350°F for 10 minutes. The breadcrumb topping stays crispy if stored properly: press parchment paper directly on top before sealing in the container. Keeps 4-5 days in the fridge and freezes for 3 months. I always make a double batch—half for dinner, half for lunches the next week. The sauce thickens as it cools, so if it seems too stiff when reheating, just add a splash of milk and stir. Leftovers get even better the second day—like a cheesy hug in bowl form.
Why You'll Love This Recipe
- Five-Ingredient Magic: I swear by this recipe because it’s the kind of dish where you just mix, melt, and serve—no fancy techniques. The butter and flour make that velvety sauce in minutes, and the sharp cheddar? It’s the star without needing anything extra.
- Creamy Crunch Combo: That perfect bite—crispy cauliflower florets with a blanket of rich, cheesy sauce—is what makes this dish ridiculously satisfying. Honestly, I’ll take this over takeout any day.
- Lunchbox Hero: Between us, this is my go-to for meal prep. Toss the leftovers in a container, and it reheats like a dream—whether it’s for my kid’s school lunch or my own lazy afternoon. The sauce stays creamy even after sitting overnight.
- Budget Stretch: Sharp cheddar and whole milk might sound fancy, but they’re actually budget-friendly staples. A single head of cauliflower and a small block of cheese feed four, and the leftovers? Even better the next day. No waste, all flavor.
Step-by-step instructions for crispy cauliflower cheese
Here's how to transform simple ingredients into a golden, bubbling cauliflower cheese with perfect texture every time.
🍳 Step 1: Prepare the Cauliflower and Create the Roux
Preheat your oven to 400°F. Cut the whole fresh cauliflower into even florets, discarding the tough core. In a large oven-safe skillet, melt 0.5 cup unsalted butter over medium heat until foaming. Add 0.25 cup all-purpose flour all at once and whisk vigorously for 1-2 minutes until the mixture turns a rich golden brown and smells nutty. This roux is your flavor foundation - don't rush it or it'll taste raw.
Here's the thing - if your roux darkens too quickly, reduce the heat slightly. You're aiming for a deep, toasty color that will carry through to your sauce. The flour should be completely incorporated with no visible streaks remaining. This step builds the creamy, velvety texture that makes this dish special.
🍳 Step 2: Build the Cheese Sauce
Gradually whisk in 1.5 cups whole milk to the roux, about ¼ cup at a time, allowing each addition to fully incorporate before adding more. The sauce will thicken dramatically as it simmers. Once smooth, stir in 2 cups sharp cheddar cheese and 1 cup gruyère cheese, breaking up any clumps with a wooden spoon. The cheese should melt completely, creating a glossy, creamy sauce that coats the back of your spoon.
Season generously with 1.5 teaspoons diamond crystal kosher salt, 0.5 teaspoon freshly ground black pepper, 0.5 teaspoon garlic powder, and 0.25 teaspoon mustard powder. Taste and adjust - the mustard powder brightens the cheese while the smoked paprika adds subtle depth. This is where the magic happens - the perfect balance of sharp, nutty, and slightly tangy flavors.
🥘 Step 3: Assemble and Bake the Cauliflower
Add the cauliflower florets to the skillet and gently stir to coat them completely in the cheese sauce. Transfer the skillet to the preheated oven and bake for 20 minutes, until the cauliflower is tender when pierced with a fork. You'll know it's ready when the edges are just beginning to soften and the sauce is bubbling around the florets.
Here's where we create that crispy topping you're craving. Remove the skillet from the oven and sprinkle 0.5 cup panko breadcrumbs evenly over the top. Return to the oven for another 5-7 minutes until the breadcrumbs are golden brown and the cheese is bubbling vigorously. The contrast between the crispy top and creamy base is what makes this dish extraordinary.
🍽️ Step 4: Finish and Serve
Let the cauliflower cheese rest for 5 minutes before serving - this allows the sauce to thicken slightly and the flavors to meld. Garnish with 0.25 cup chopped fresh parsley and a sprinkle of 0.5 teaspoon smoked paprika for color and additional depth. Serve immediately while the breadcrumbs are still crisp and the cheese is perfectly melty.
The secret to success lies in timing - serve this while the breadcrumbs are crunchy and the cheese is still bubbling. Each bite should deliver that perfect combination of textures: crispy top, creamy sauce, and tender cauliflower. This dish holds together beautifully for about 20 minutes after baking, so don't wait too long to serve.
Pro Tips For Making Basic Cauliflower Cheese
- Chop Cauliflower Small: Break florets into 1-inch chunks—no bigger or they’ll stay undercooked, no smaller or they’ll turn to mush. I learned this the hard way after serving a batch with uneven pieces where the centers were still crunchy.
- Melt Butter Low: Heat butter over medium-low—high heat burns flour before it browns. After burning three batches, I finally figured out that patience here means a smoother sauce. (Yes, even if you’re impatient like me.)
- Grate Cheese Fresh: Skip pre-shredded cheese—it’s coated with anti-caking agents that make the sauce grainy. A box grater takes 30 seconds and makes a real difference in texture. (Your future self will thank you.)
- Simmer Sauce Long: Let the roux cook 3–5 minutes until it’s golden but not brown—this removes the raw flour taste. I used to rush it, and the sauce always tasted like glue. (Does it look weird? Yes. Does it work? Every single time.)
Creative variations of this basic cauliflower cheese
Spicy Cajun Kick
Transform this comfort classic into a flavor explosion by adding 1 tbsp Cajun seasoning to the cheese sauce and topping with ½ cup crushed pork rinds instead of breadcrumbs. The smoky, spicy notes from Penzeys Spicy Cajun cut through the richness beautifully.
For extra heat, stir in 1 tsp cayenne pepper with the mustard powder. Serve with cooling elements like sour cream dollops or cooling cucumber slices to balance the heat. 🌶️
Truffle Gourmet Upgrade
Elevate your cauliflower cheese with 1 tbsp white truffle oil drizzled over the finished dish and a sprinkle of 1 tbsp grated Parmesan mixed into the sauce. The earthy aroma of truffle oil transforms this into a restaurant-worthy dish.
I recommend Balsamic Vinegars Truffle Oil for its rich, authentic flavor. Add ½ tsp truffle salt to the breadcrumbs before baking for an extra layer of luxury. This version pairs perfectly with a crisp Sauvignon Blanc.
Buffalo Blue Cheese Twist
Swap the cheddar and Gruyère for 1 cup blue cheese crumbles and add ½ cup hot sauce (like Frank's RedHot) to the cheese sauce. Top with ¼ cup crumbled blue cheese and 2 tbsp chopped green onions before serving.
The tangy, spicy blue cheese creates a bold flavor profile that's perfect for game day. Serve with celery sticks and carrot sticks for dipping. 💫
Vegetarian Potato Addition
Make this a heartier dish by adding 1 lb baby potatoes, halved and boiled for 10 minutes before mixing with the cauliflower. The potatoes soak up the cheese sauce beautifully, creating a satisfying texture contrast.
For extra richness, stir in ½ cup cream cheese with the other cheeses. This version works well as a standalone vegetarian main course. 🥔
Herb-Infused Garden Version
Brighten the dish with fresh herbs by adding 2 tbsp chopped chives and 1 tbsp chopped thyme to the cheese sauce. Garnish with ¼ cup chopped dill and 2 tbsp grated lemon zest before serving.
The fresh, bright flavors make this perfect for spring or summer dinners. For extra color, add ½ cup cherry tomatoes, halved, to the top before baking. 🌿
Breakfast-for-Dinner Hash
Turn this into a breakfast-inspired hash by adding ½ cup cooked breakfast sausage (like Johnsonville) and ¼ cup diced bell peppers to the skillet with the cauliflower. Top with a fried egg after baking for a protein-packed meal.
The runny yolk creates the perfect sauce for dipping into the cheesy cauliflower. This version is perfect for brunch or a lazy weekend morning. 🍳
Nutrition facts
Frequently asked questions
Can I make this cauliflower cheese ahead of time?
Assemble the dish up to 24 hours in advance, cover tightly with foil, and refrigerate. When ready to bake, let it sit at room temperature for 30 minutes before baking at 375°F for 25-30 minutes (covered with foil for the first 15 minutes to prevent over-browning). The flavors develop beautifully overnight!
Why did my cheese sauce turn grainy?
Grainy cheese usually means the sauce got too hot or the cheese wasn't melted properly. Always melt cheese low and slow over gentle heat, stirring constantly. For extra smoothness, mix 1 tbsp cornstarch with 2 tbsp cold milk, then whisk into the sauce at the end. Pre-shredded cheese contains anti-caking agents that make it clump—use freshly grated cheese whenever possible!
Can I use a different type of cheese?
Yes! While cheddar and Gruyère create the classic flavor, try Monterey Jack for creaminess or Pepper Jack for a mild kick. For a dairy-free option, use vegan cheddar and add 1 tbsp nutritional yeast for depth. Just remember—cheeses with high moisture content (like mozzarella) may make the sauce too thin. Always melt cheeses separately before combining!
How do I make the breadcrumb topping extra crispy?
For maximum crunch, toast the panko in a dry skillet over medium heat for 2-3 minutes until golden before sprinkling on top. Mix in 1 tbsp melted butter with the breadcrumbs for extra richness. Place the dish under the broiler for the final 2-3 minutes of baking, watching closely to prevent burning. A light sprinkle of paprika adds color and flavor too!
Is this dish suitable for meal prep?
Perfect for meal prep! Portion into airtight containers and refrigerate for up to 5 days. Reheat covered with foil at 350°F for 15-20 minutes, then broil for 2 minutes to restore crispiness. Freeze for 3 months—thaw overnight in the fridge and reheat as above. The sauce may thicken when reheated, so add a splash of milk if needed. Pro tip: Store the breadcrumb topping separately and sprinkle fresh before serving!