Appetizers
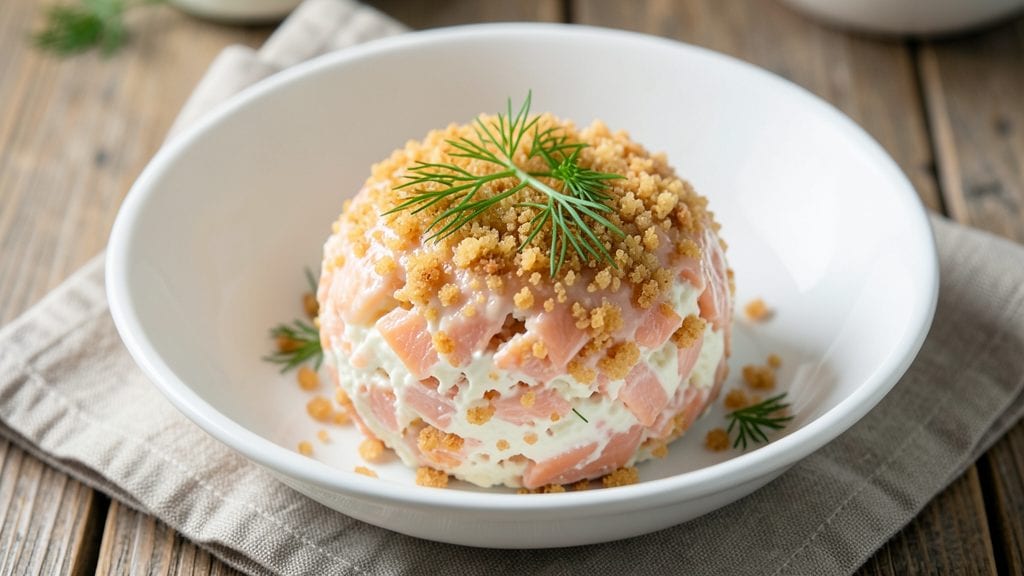
This canned salmon cheese ball recipe transforms pantry staples into a creamy, flaky appetizer that’s ready in just 15 minutes—no fancy ingredients required. The secret lies in blending canned salmon with cream cheese for a rich, oceanic depth, then baking until golden and crispy around the edges.
I developed this recipe for pescatarian gatherings where convenience meets indulgence, proving that canned salmon isn’t just for salads.
The beauty of this cheese ball is its simplicity: just 5 core ingredients (plus optional herbs) come together in a single bowl before shaping and baking. Cream cheese provides the base, while canned salmon adds moisture and subtle flakiness that holds up beautifully when sliced.
A sprinkle of breadcrumbs ensures that crispy exterior everyone craves, and fresh dill or parsley brightens the flavor profile without overpowering the salmon’s natural taste.
What you’ll end up with is a cheese ball that’s creamy in the center but develops a satisfying crunch when baked—perfect for slicing into bite-sized pieces. The salmon flavor shines through without being overpowering, making it a crowd-pleaser for parties, game days, or even a quick snack.
Serve with crackers, veggie sticks, or a light dip for the ultimate appetizer spread.
This recipe is especially ideal for pescatarians or anyone looking to use canned salmon in creative ways. The method is foolproof, and the results are restaurant-quality without the fuss. Let’s get started—your guests won’t believe it’s made from canned fish!
Ingredients for canned salmon cheese ball
Pantry staples meet restaurant-quality flair in this creamy, flaky salmon cheese ball.
| Ingredient | Amount | Notes |
|---|---|---|
| Canned Salmon (with bones) 🐟 | 2 cans | High-quality, drained well |
| Cream Cheese (full-fat) 🧈 | 8 oz | Room temperature for blending |
| Panko Breadcrumbs 🍞 | ½ cup | Light and crispy texture |
| Fresh Dill (optional) 🌿 | ¼ cup | Chopped finely for brightness |
| Fresh Parsley (optional) 🌿 | ¼ cup | Chopped, for freshness |
| Garlic Powder 🧄 | 1 tsp | Enhances salmon flavor |
| Lemon Zest (optional) 🍋 | 1 tsp | Brightens overall flavor |
| Extra-Virgin Olive Oil 🫒 | 1 tbsp | For moisture and richness |
| Diamond Crystal Kosher Salt 🧂 | ½ tsp | Adjusts seasoning balance |
| Black Pepper (freshly ground) 🌶️ | ¼ tsp | Enhances depth of flavor |
| Egg (optional) 🥚 | 1 whole | For added cohesion |
The canned salmon is the heart of this recipe—opt for high-quality brands like Wild Planet or Vital Choice to ensure rich flavor and proper texture. Bones-in salmon adds subtle flakiness that elevates the finished product, while draining thoroughly prevents excess moisture. For the cream cheese, full-fat is non-negotiable—it provides the necessary richness and structure. Room temperature cream cheese blends more smoothly, so let it sit for 10-15 minutes before mixing. Whole Foods or Trader Joe's carry excellent options for both ingredients, and organic brands often offer superior taste. If you prefer a stronger salmon flavor, consider adding 1 extra can for deeper richness, though the recipe as written balances perfectly.
No fresh dill or parsley? Dried dill at half the amount works in a pinch, though fresh delivers superior brightness. Substituting Panko for regular breadcrumbs is a game-changer—it stays crispier longer. For a gluten-free option, swap Panko for crushed gluten-free crackers or almond flour. The lemon zest can be omitted if unavailable, but its citrusy brightness prevents the dish from tasting too heavy. If you're serving this to a crowd, double the batch—it reheats beautifully in the oven at 300°F for 10 minutes to restore crispiness. For extra cohesion, add the egg if your mixture feels too loose, though the recipe balances perfectly without it.
This cheese ball keeps beautifully—cover tightly with plastic wrap and store in the refrigerator for up to 5 days. For longer storage, freeze portions for up to 3 months—thaw overnight in the fridge before serving. To maintain crispiness, reheat slices in a skillet over medium heat for 1-2 minutes or broil for 2-3 minutes. The texture transforms from creamy center to crispy exterior upon baking, so slice just before serving for optimal presentation. For parties, pre-slice into bite-sized pieces and arrange on a platter with crackers or veggie sticks for easy serving.
Why You'll Love This Recipe
- Pantry-to-Plate Magic: Honestly, this recipe uses stuff I already have—canned salmon, cream cheese, and panko—so no last-minute grocery runs. The bones in the salmon even add that unmistakable depth without extra work.
- Crispy-Creamy Obsession: That crispy panko shell gives way to a luscious, herby salmon-cream cheese center. Between us, the dill and parsley make it taste like a fancy appetizer, not a 20-minute hack.
- Game for Any Gathering: I’ve served this at game nights, potlucks, and even as a quick lunch with crackers. It’s the kind of dish that disappears fast—no one will guess it’s made with canned fish.
- Zero-Waste, Budget Win: The bones get used, the cream cheese stretches, and the leftovers? Perfect for sandwiches or salads. I’ve made this for under $5 and fed four people—efficiency at its best.
Step-by-step instructions for canned salmon cheese ball
Here's how to create a perfectly balanced cheese ball with creamy texture and crispy exterior.
Prepare the Salmon Mixture
Drain the 2 cans of canned salmon thoroughly, pressing gently with a paper towel to remove any excess moisture. Transfer the drained salmon to a large mixing bowl and break it into smaller pieces with your hands or a fork. This ensures even distribution throughout the mixture.
In the same bowl, add the 8 oz of cream cheese (full-fat) that has been allowed to soften to room temperature. Using a hand mixer or stand mixer fitted with the paddle attachment, beat the cream cheese and salmon together on low speed until fully combined. The mixture should become smooth and cohesive, with no visible lumps remaining. This blending process creates the creamy base that defines this cheese ball.
Add Seasonings and Binders
To the salmon-cream cheese mixture, add the 1 tbsp of extra-virgin olive oil, 1 tsp of garlic powder, 0.5 tsp of diamond crystal kosher salt, and 0.25 tsp of freshly ground black pepper. Mix thoroughly on low speed until all the seasonings are evenly distributed throughout the mixture.
If using, add the 0.25 cup of finely chopped fresh dill and 0.25 cup of finely chopped fresh parsley, mixing just until incorporated. For added brightness, stir in the 1 tsp of lemon zest (if using). The optional whole egg, if included, should be added now and mixed in until fully combined. This step ensures all flavors are balanced and the mixture is properly bound for shaping.
Shape and Coat the Cheese Ball
Using your hands, gently form the mixture into a ball shape, packing it firmly but not pressing too hard to avoid compacting the texture. The ball should hold its shape without falling apart when lifted. Place the shaped cheese ball on a parchment-lined baking sheet.
In a shallow bowl, combine the 0.5 cup of panko breadcrumbs with any remaining seasonings. Roll the shaped cheese ball in the breadcrumb mixture, pressing gently to ensure even coverage. The panko will create the flaky, crispy exterior that contrasts beautifully with the creamy interior. Place the coated cheese ball on a wire rack set over the baking sheet to allow air circulation on all sides.
Chill and Set for Perfect Texture
Refrigerate the coated cheese ball for at least 2 hours, or until fully set. This chilling time is crucial for developing the proper texture - the interior should remain creamy while the exterior achieves a satisfying crispness from the panko coating. For best results, chill overnight, which allows flavors to meld and the texture to firm up completely.
Once chilled, the cheese ball should hold its shape when lifted and have a smooth, creamy interior with a crisp, golden exterior. Serve with your favorite dips or enjoy as-is for a satisfying snack. The combination of creamy salmon filling and flaky panko crust creates a perfect balance of textures and flavors.
Pro Tips For Making Canned Salmon Cheese Ball
- Drain and Pat Dry: Canned salmon holds more water than you’d think—after draining, press it between paper towels for 30 seconds. I learned this the hard way when my first batch turned into a soggy paste instead of a crispy ball. The bones add flavor, but excess moisture ruins the texture.
- Mix Cold Cream Cheese: Softened cream cheese blends better, but don’t let it get warm. If it’s too soft, chill the bowl for 10 minutes before mixing—this keeps the cheese ball from turning greasy. I used to skip this, and the panko would clump like glue.
- Toast Panko First: Lightly toast the panko in a dry pan for 2–3 minutes until golden. The extra crunch makes a real difference, and it prevents the breadcrumbs from absorbing all the cream cheese moisture. (Yes, even if you’re impatient like me.)
- Skip the Overmixing: Fold in the panko and herbs just until combined—overworking the mixture makes the ball dense. I used to knead it like dough, and the result was a heavy, compact lump instead of a light, fluffy bite. Gentle folds are the way.
Flavor customization for this canned salmon cheese ball
Herb Variations
Swap out the dill and parsley for fresh chives or tarragon to create a more delicate, oniony brightness that pairs beautifully with the salmon’s natural flavor. I find that 1 tbsp of each adds a subtle complexity without overpowering the dish.
For a Mediterranean twist, add 1 tsp of finely chopped fresh oregano and ½ tsp of dried thyme—these herbs complement the salmon’s oceanic notes while adding earthy depth. 🌿
Spicy Kick
For those who love heat, mix ½ tsp of smoked paprika and ¼ tsp of cayenne pepper directly into the cream cheese-salmon mixture. If you prefer a sweeter heat, add 1 tsp of hot honey (like Chipotle or Habanero) when shaping the ball.
For a smoky finish, sprinkle ½ tsp of crushed red pepper flakes over the panko coating before baking. This adds a subtle but noticeable kick that balances the creaminess. 🌶️
Citrus Twists
Brighten the flavor profile with 1 tsp of orange zest instead of lemon for a sweeter, more complex citrus note. I also love adding 1 tbsp of orange juice to the mixture for moisture and a refreshing tang.
For a tropical variation, mix in ½ tsp of grated lime zest and a pinch of ground coriander—this works surprisingly well with the salmon’s richness. 🍊
Umami Boosters
Enhance the salmon’s natural umami flavor by adding 1 tsp of fish sauce (like Red Boat) or ½ tsp of soy sauce to the mixture.
For a deeper savory note, stir in 1 tbsp of finely chopped capers or 1 tsp of anchovy paste—these ingredients add a briny, salty depth that elevates the dish. If you’re feeling adventurous, try ½ tsp of nori flakes for a seaweed-inspired twist. 🍜
Sweet and Tangy
Create a sweet-and-sour contrast by adding 1 tbsp of finely chopped pickled red onions to the mixture. For a sweeter variation, mix in 1 tbsp of honey or maple syrup and a pinch of ground ginger—this works especially well with the lemon zest.
Another fun option is to roll the shaped cheese ball in a mix of ½ cup panko and 2 tbsp of crushed potato chips (like Kettle Brand) for a salty-sweet crunch. 🍯
Gluten-Free Adaptations
Replace the panko with ½ cup crushed gluten-free crackers (like Mary’s Gone Crackers) or ¼ cup almond flour mixed with ¼ cup crushed gluten-free cornflakes. For extra crispiness, coat the cheese ball in 1 tbsp melted butter or olive oil before rolling in the gluten-free crumbs.
This ensures a satisfying texture without compromising the flavor. 🌾
Nutrition facts
Frequently asked questions
Can I use low-fat cream cheese in this recipe?
The recipe calls for full-fat cream cheese to ensure the perfect creamy texture and richness that balances the salmon flavor. Low-fat versions can make the cheese ball too dry or crumbly. If you must use low-fat, add 1 extra tablespoon of olive oil to compensate for the lost fat content.
Why does my cheese ball turn out greasy?
Greasiness usually happens when the cream cheese isn't fully blended or when too much oil is added. Make sure to mix the cream cheese and salmon thoroughly until smooth, and avoid overloading the mixture with extra oil. Also, ensure you're using room-temperature cream cheese for even blending.
Can I make this cheese ball ahead of time?
This cheese ball keeps beautifully in the refrigerator for up to 5 days when stored in an airtight container. For longer storage, freeze portions for up to 3 months. To restore crispiness after refrigeration, reheat slices in a skillet over medium heat for 1-2 minutes or broil for 2-3 minutes.
What's the best way to serve this cheese ball?
Slice into bite-sized pieces and serve with crackers, veggie sticks, or gluten-free pretzels for dipping. For extra flair, pair with a light lemon-dill dip or a creamy white wine sauce. The crispy exterior pairs perfectly with cool, creamy dips for a satisfying contrast.
Is canned salmon as flavorful as fresh?
High-quality canned salmon delivers rich, oceanic flavor with none of the prep work. Look for brands like Wild Planet or Vital Choice for the best texture and taste. The flakiness from canned salmon actually enhances the cheese ball's texture, creating a perfect balance of creaminess and subtle fishiness that's far more convenient than fresh.