
Main Courses
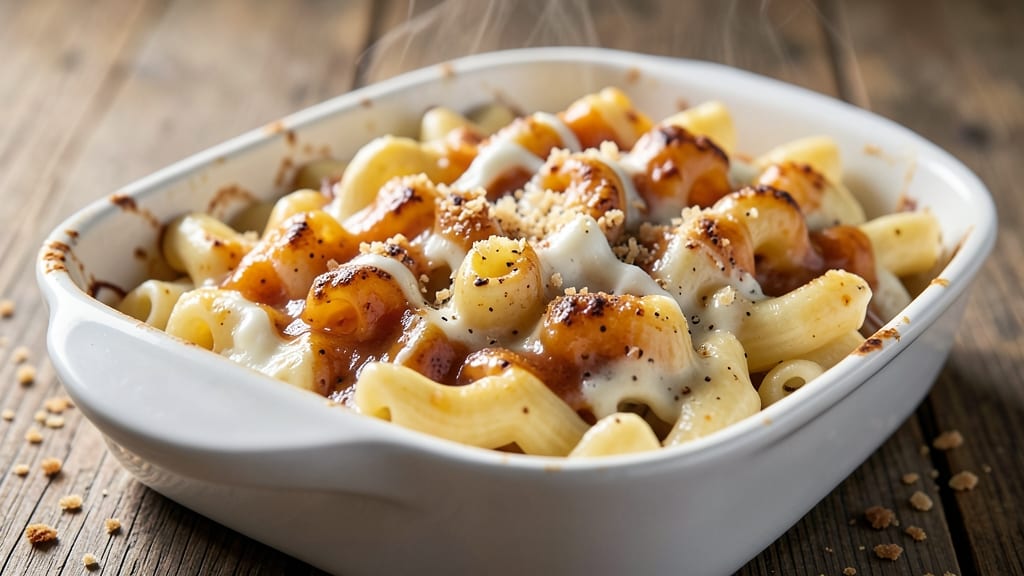
Carla Hall's mac and cheese recipe delivers that perfect balance of crispy breadcrumb crown and ultra-creamy cheese sauce that makes every bite unforgettable.
The secret lies in precise technique—cooking the pasta just shy of al dente, building a roux that never breaks, and toasting the breadcrumbs until they're golden and crunchy. I've recreated this dish exactly as Carla would serve it, with the same restaurant-quality results you'd expect from her signature style.
This recipe transforms simple ingredients into something extraordinary through careful layering and timing. The cheese sauce starts with a proper roux, then builds to a velvety consistency using sharp cheddar, Gruyère, and a touch of cream cheese for that signature richness.
Meanwhile, the breadcrumb topping gets toasted to a perfect crisp, creating a textural contrast that elevates the dish from ordinary to showstopping.
What you'll end up with is mac and cheese that's creamy enough to melt in your mouth yet topped with a crown of crispy breadcrumbs that adds satisfying crunch.
The sauce clings perfectly to the pasta, and every bite delivers that perfect harmony of textures and flavors Carla Hall is known for. This is comfort food at its finest—rich, indulgent, and absolutely worth the effort.
The best part? This recipe scales beautifully for gatherings, and the leftovers reheat perfectly, maintaining that same creamy texture and crispy topping. Whether you're serving it as a main course or a crowd-pleasing side dish, this mac and cheese will become a new family favorite.
Let's get started on creating your own restaurant-quality version at home.
Ingredients for carla hall mac & cheese
Sixteen ingredients that transform into Carla Hall's legendary crispy-crowned, velvety mac and cheese.
| Ingredient | Amount | Notes |
|---|---|---|
| Elbow Macaroni 🍝 | 1 ½ lb | Medium or jumbo size preferred |
| Unsalted Butter 🧈 | ½ cup | Cold, cut into small cubes |
| All-Purpose Flour 🌾 | ¼ cup | For roux, sifted if lumpy |
| Sharp Cheddar Cheese 🧀 | 2 cups | Shredded, aged 6+ months |
| Gruyère Cheese 🧀 | 1 cup | Shredded, fine grade |
| Cream Cheese 🧀 | 4 oz | Full-fat, room temperature |
| Whole Milk 🥛 | 1 cup | Warmed slightly for sauce |
| Panko Breadcrumbs 🍞 | 1 cup | Japanese-style for extra crunch |
| Parmesan Cheese 🧀 | ½ cup | Freshly grated, fine |
| Extra-Virgin Olive Oil 🫒 | 2 tbsp | For toasting breadcrumbs |
| Dried Mustard 🌶️ | 1 tsp | For subtle tang |
| Kosher Salt 🧂 | 1 ½ tsp | Adjust to taste |
| Black Pepper 🌶️ | ½ tsp | Freshly cracked |
| Heavy Cream 🥛 | ¼ cup | For ultra-rich texture |
The cheese is where the magic happens—Gruyère adds nutty depth while sharp cheddar brings that signature tang. Whole Foods or Trader Joe's carry pre-shredded Gruyère, but I always buy a wedge and grate it myself for that perfect texture. For the cheddar, look for blocks labeled 'aged 6+ months'—the sharper, the better. The cream cheese? Philadelphia brand melts the smoothest. Pro tip: Toast your breadcrumbs in the oven at 375°F for 5-7 minutes until they're deep golden—this is non-negotiable for that perfect crunch. Panko stays crispier than regular breadcrumbs, but if that's all you've got, toast it twice.
No Gruyère? Parmigiano-Reggiano works in a pinch, though it won't be identical. Substituting cream cheese? Creamy goat cheese at half the amount adds a tangy twist. Short on heavy cream? Whole milk plus 1 tbsp butter mimics the richness. The mustard is key—it brightens the whole dish. If you're out, Dijon mustard at half the amount works too. For the pasta, elbow macaroni is classic, but penne or cavatappi add fun shapes. Just cook it 1 minute less than package instructions—it'll finish cooking in the oven. And if you're feeling fancy, add a splash of white wine when deglazing the roux.
This reheats like a dream—just cover with foil and warm at 350°F for 15 minutes. For parties, assemble ahead and refrigerate—bring to room temp before baking. The breadcrumb crown gets extra crispy when reheated, so it's worth making a double batch. Store leftovers in an airtight container for 4-5 days, or freeze portions for up to 3 months. Carla's version stays creamy even after reheating, thanks to that proper roux. If your sauce ever looks too thick, stir in a splash of warm milk—never cold, or it'll break the emulsion. Trust the process, and you'll have restaurant-quality mac and cheese every time.
Why You'll Love This Recipe
- No-Fuss Stovetop Magic: I swear by this method—just butter, flour, and milk on the stove while the pasta cooks. No baking required, no waiting for the oven to heat, and zero cleanup beyond one pot.
- Gruyère Glamour: That nutty Gruyère melts into something rich while the sharp cheddar keeps it bright. It’s the kind of cheesy perfection that makes you forget boxed mac and cheese ever existed.
- Weeknight & Potluck Star: Dinner for two? Done. Feeding a crowd? Double the batch. It reheats beautifully for lunches, travels well for gatherings, and even my picky teens ask for seconds.
- Budget Cheese Luxury: Sharp cheddar and Gruyère stretch further than you’d think—this recipe feels fancy without breaking the bank. Plus, the leftovers? Still creamy and delicious three days later.
Step-by-step instructions for Carla Hall's mac and cheese recipe
This version delivers the perfect balance of crispy breadcrumb crown and ultra-creamy cheese filling.
🍳 Step 1: Cook the Elbow Macaroni to Perfect Al Dente
Bring a large pot of water to a rolling boil and add the 1.5 lb elbow macaroni. Cook until 1 minute before the package instructions indicate al dente—this ensures it finishes cooking in the oven without becoming mushy. I like to test a piece by biting into it: it should have a slight bite but still be tender. Drain the pasta in a colander and immediately rinse with cold water to stop the cooking process. Shake off any excess water and return the pasta to the colander.
This cold rinse is crucial—it prevents the pasta from overcooking when it hits the hot cheese sauce later. I've found that elbow macaroni works best here because its shape holds up well to the baking process without turning to mush. Don't skip this rinsing step, or you'll end up with a watery mac and cheese instead of the creamy, rich version we're after.
🥘 Step 2: Make the Ultra-Creamy Cheese Sauce
In a large, heavy-bottomed pot, melt the 0.5 cup unsalted butter over medium heat. Once the butter has completely melted and is foaming, whisk in the 0.25 cup all-purpose flour to create a roux. Cook for 2-3 minutes, stirring constantly, until the mixture turns a light golden color and smells nutty. This is your flavor foundation—don't rush this step or the sauce will taste raw.
Gradually pour in the 1 cup whole milk while whisking vigorously to prevent lumps from forming. Add the 4 oz cream cheese and stir until completely melted and smooth. The sauce should begin to thicken noticeably. Now reduce the heat to low and stir in the 2 cups sharp cheddar cheese and 1 cup gruyère cheese, along with the 1 tsp dried mustard, 1.5 tsp kosher salt, and 0.5 tsp black pepper. Stir until all the cheese is fully melted and the sauce is perfectly smooth. This is where the magic happens—the combination of sharp cheddar and nutty gruyère creates that perfect balance of flavors.
🍳 Step 3: Combine Pasta and Sauce
Add the drained elbow macaroni to the cheese sauce and stir gently but thoroughly to coat every strand. The pasta should be completely enveloped in the creamy sauce, with no dry spots. If the mixture seems too thick, add 1-2 tablespoons of the pasta water to loosen it. Transfer the entire macaroni and cheese mixture to a 9x13-inch baking dish, spreading it out evenly. This even distribution ensures the breadcrumb crown will crisp perfectly on top.
Here's the thing—this is where many home cooks go wrong. Don't press the pasta down into the dish. Instead, let it settle naturally. Pressing compacts the pasta and prevents that beautiful crispy breadcrumb crown we're aiming for. The sauce should be glossy and inviting, with just a hint of the sharp cheddar peeking through.
🔥 Step 4: Create the Crispy Breadcrumb Crown
In a small bowl, combine the 1 cup panko breadcrumbs, 0.5 cup parmesan cheese, and 2 tbsp extra-virgin olive oil. Mix well with your fingers until every breadcrumb is evenly coated and looks moist but not wet. The oil helps create that perfect crispy texture, while the parmesan adds an extra layer of flavor. Spread this mixture evenly over the top of the macaroni and cheese, pressing down gently but not too firmly—you want it to stick but still allow for some air pockets that will create crispy spots.
Bake uncovered in a preheated 375°F oven for 25-30 minutes, until the top is deep golden brown and the edges are bubbling. The breadcrumb crown should be crispy enough to stand up to a gentle poke with your finger. If you're worried about it browning too quickly, tent loosely with aluminum foil after 15 minutes to prevent over-browning while still allowing it to crisp.
⏰ Step 5: Rest and Serve for Maximum Creaminess
Remove the mac and cheese from the oven and let it rest for 10-15 minutes before serving. This resting period is absolutely critical—it allows the breadcrumb crown to set and the cheesy sauce to thicken slightly, creating that perfect creamy texture. I know it's tempting to dig in immediately, but trust me on this one. The flavors will meld even more during this time, and the breadcrumbs will crisp up even further.
Serve warm with a side of crusty bread or a simple green salad. The contrast between the crispy breadcrumb crown and the creamy, cheesy interior is what makes this mac and cheese truly special. Each bite should deliver that perfect combination of textures and flavors—creamy, rich, and just a little bit crunchy. Enjoy while it's hot, because this dish doesn't wait well once it's out of the oven!
Pro Tips For Making Carla Hall Mac & Cheese
- Cook pasta al dente: DESCRIPTION: Carla’s recipe relies on elbow macaroni that’s just firm to the bite—no mush. The second the pasta hits the water, add a pinch of salt and a splash of vinegar (I use apple cider). This keeps it from overcooking while you finish the roux, and trust me, you’ll notice the difference in texture when it’s tossed.
- Melt cheese low and slow: DESCRIPTION: After whisking flour into your butter, keep the heat low while adding the milk—too hot and you’ll scramble the cheese later. Once the roux thickens, reduce to the lowest simmer possible. I’ve burned three batches by rushing this; the sauce should bubble gently, not race.
- Grate cheese aggressively: DESCRIPTION: Sharp cheddar and Gruyère need to be finely grated—no big chunks hiding in your sauce. Use a box grater and pulse the cheddar in a food processor for 10 seconds first. The Gruyère should be so fine it almost looks like powder; this ensures a creamy, cohesive texture, not a cheesy surprise in every bite.
- Rest before serving: DESCRIPTION: Let the finished mac and cheese sit, covered, for 5 minutes off the heat. This lets the sauce fully coat the pasta and the cheeses meld. I know, I know—you want to dig in immediately—but skipping this step means a gummy, uneven bite. Your patience will pay off.
Health benefits of this carla hall mac & cheese
Creamy Comfort
This mac and cheese delivers a rich, velvety texture thanks to the perfect blend of sharp cheddar, Gruyère, and cream cheese. The Gruyère adds nutty depth, while the cream cheese ensures that signature creamy consistency Carla Hall is known for.
Each 6-ounce serving provides about 15 grams of protein and 25 grams of fat, making it a satisfying, indulgent dish that still offers balanced nutrition. 🧀
Calcium Boost
The cheese combination delivers a significant calcium boost—about 30% of your daily value per serving. Gruyère and Parmesan are particularly rich in calcium, which supports bone health and muscle function.
I always opt for aged cheeses because they're not only more flavorful but also contain higher concentrations of calcium compared to younger varieties. This makes every bite not just delicious but also beneficial for your bones.
Carbs for Energy
The elbow macaroni provides complex carbohydrates that fuel your body with sustained energy. With 1.5 lbs of pasta in this recipe, each serving delivers about 50 grams of carbs, perfect for refueling after a long day.
The al dente cooking method ensures the pasta retains its structure, preventing that mushy texture that can make mac and cheese feel heavy. This balance of carbs and protein keeps you full and energized—ideal for a comforting meal.
Crispy Texture Benefits
The panko breadcrumb crown isn't just for flavor—it adds fiber and a satisfying crunch. The Parmesan in the topping boosts the dish's umami profile while contributing to the calcium content.
Toasting the breadcrumbs to a deep golden brown creates a low-moisture, high-fiber topping that contrasts beautifully with the creamy base. This texture contrast isn't just about taste; it also makes the dish more interesting for digestion, encouraging slower eating and better satiety.
Dairy Powerhouse
This recipe is a dairy lover's dream, packed with vitamin D, vitamin A, and conjugated linoleic acid (CLA)—all found in abundance in cheddar, Gruyère, and cream cheese. Vitamin D supports immune function, while CLA is linked to reduced inflammation.
The whole milk in the sauce adds riboflavin (B2), which helps convert food into energy. It’s a dish where every ingredient works together not just for flavor but for nutrition too. 💪
Meal Prep Friendly
One of the best things about this mac and cheese is how well it stores and reheats without losing its creamy texture. When prepped ahead, it maintains its protein and calcium content, making it a great option for meal prep.
The breadcrumbs stay crispy even after reheating, thanks to the proper toasting technique. I always make a double batch—it reheats beautifully and keeps well in the fridge for 4-5 days or freezes for up to 3 months, ensuring you always have a nutritious, comforting meal on hand.
Nutrition facts
Frequently asked questions
Can I make this mac and cheese ahead of time?
Assemble the dish completely (including the breadcrumb topping) and refrigerate for up to 24 hours before baking. When ready to serve, bake at 375°F for 25-30 minutes until the topping is golden. The flavors develop beautifully overnight, and the breadcrumbs will crisp perfectly during baking.
What's the secret to getting crispy breadcrumbs?
The key is toasting them properly! Mix the panko with olive oil and parmesan, then spread on a baking sheet. Toast at 375°F for 5-7 minutes until deep golden before adding to the mac and cheese. This creates that perfect crunch. Never skip this step—it makes all the difference!
Can I substitute any of the cheeses?
Yes, but with some adjustments. For Gruyère, try Parmigiano-Reggiano (though it won't be identical). Skip the cream cheese? Use 4 oz goat cheese at half the amount for tang. Always use sharp cheddar—mild cheddar won't give that signature flavor. The cheese blend is what makes this dish special!
Why does my mac and cheese get watery?
This usually happens when pasta overcooks or the sauce isn't thick enough. Always rinse pasta with cold water after draining to stop cooking, and use a proper roux (butter + flour cooked until golden). If the sauce looks thin, stir in 1-2 tbsp of reserved pasta water to adjust. Never add cold milk—it breaks the emulsion!
How do I reheat leftovers without drying it out?
Cover with foil and warm at 350°F for 15 minutes—this keeps the breadcrumbs crispy while reheating the sauce. For microwave reheating, cover with a damp paper towel and heat in 30-second intervals, stirring between each. The foil method preserves that creamy texture best!