Snacks
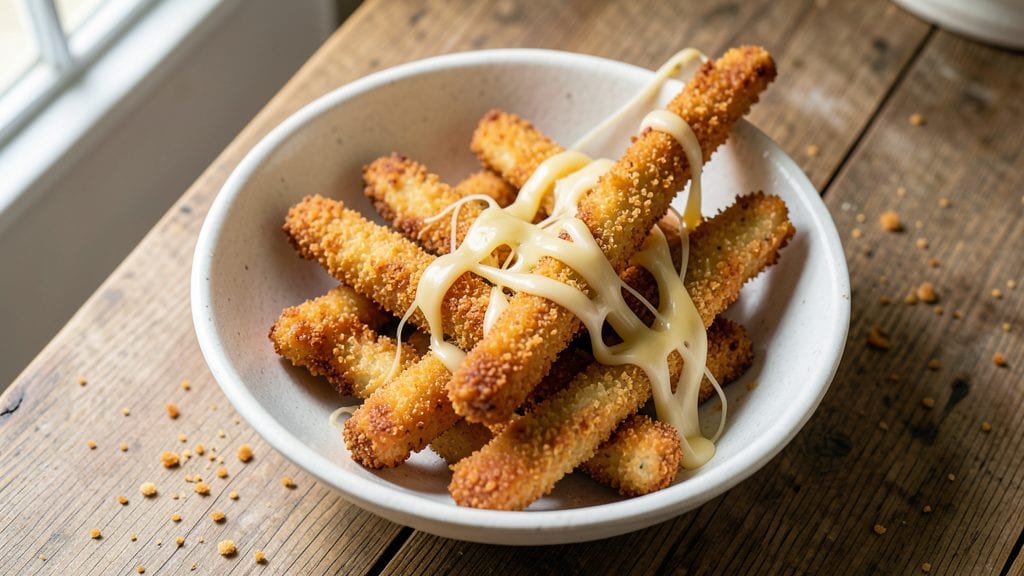
This cheese on a stick copycat recipe delivers all the crispy, melty magic of your favorite fast-casual favorite—right in your own kitchen.
The secret lies in a light, airy breading that stays perfectly golden while keeping the mozzarella gooey inside, just like the version that disappears from the menu too fast. I’ve tested countless variations to perfect the texture, and trust me, this is the one that’ll have everyone asking for seconds.
What makes this recipe special is how it balances simplicity with that restaurant-quality crunch. You’ll need just five key ingredients—mozzarella, flour, eggs, breadcrumbs, and a pinch of seasoning—and about 20 minutes of active time.
Whether you’re frying in oil or using an air fryer for a lighter version, the result is always crispy on the outside, creamy on the inside, with that satisfying pull-apart texture that makes every bite worth it.
The real game-changer? The dipping sauce. A quick blend of marinara and ranch creates the perfect balance of tangy and creamy, so you can enjoy these bites just like you would at your favorite spot.
Serve them warm with toothpicks for easy snacking, and watch them vanish faster than you can say “copycat win.” Ready to make this your new go-to appetizer?
This recipe works for parties, game day, or just a cozy night in—plus, it’s easy to double or halve the batch. The best part? You’ll save money and avoid the crowds, all while enjoying the same crispy, melty perfection you love. Let’s get started!
Ingredients for cheese on a stick copycat
Five key ingredients and one game-changing technique—crispy, melty perfection every time.
| Ingredient | Amount | Notes |
|---|---|---|
| Mozzarella Cheese Sticks 🧀 | 24 whole | Low-moisture, pre-sliced sticks |
| All-Purpose Flour 🌾 | 2 cups | Light, sifted for even coating |
| Large Eggs 🥚 | 2 whole | Room temperature for smooth dredge |
| Panko Breadcrumbs 🍞 | 3 cups | Extra-crispy, not regular breadcrumbs |
| Garlic Powder 🧄 | 1 tbsp | For that signature flavor punch |
| Onion Powder 🧅 | 1 tbsp | Adds depth to the breading |
| Ground Black Pepper 🌶️ | ½ tsp | Freshly cracked for best flavor |
| Vegetable Oil 🫒 | 3 cups | High smoke point for frying |
| Marinara Sauce 🍅 | 1 cup | Smooth, no chunks preferred |
| Ranch Dressing 🥛 | 1 cup | Classic or herb blend works |
| Salt 🧂 | ½ tsp | Kosher or sea salt preferred |
| Toothpicks 📌 | 24 whole | Wooden, for easy serving |
The mozzarella sticks make or break this. Low-moisture cheese is non-negotiable—it stays gooey inside without getting soggy. Grab the pre-sliced sticks from the deli section (the ones shaped like sticks, not rounds). If you can't find them, string cheese cut into 2-inch pieces works too, but it won't be as authentic. For the breading, Panko is a must—it's lighter and stays crispier than regular breadcrumbs. I always buy the Goya brand because it's consistent, but any extra-crispy panko will do. The secret to that signature flavor? Garlic powder and onion powder—don't skip these, they're what makes it taste like the real deal!
No panko? Crushed cornflakes or Ritz crackers can stand in, but the texture won't be quite the same. Running out of ranch? Mix mayo with a splash of buttermilk and dried dill for a quick fix. The marinara can be homemade or store-bought—just make sure it's smooth. Rao's or Prego work great. For the oil, vegetable or canola are best because they have high smoke points. If you're frying, keep the oil at 350°F—any hotter and the breading burns before the cheese melts. Pro tip: Use a candy thermometer to keep it perfect every time. And yes, you can air fry these—just spray with oil and cook at 375°F for 8-10 minutes, flipping halfway.
Once fried, keep the cheese sticks warm in a 200°F oven while you finish the batch—they stay crispy this way. The dipping sauce is best made fresh, but you can prep it ahead and store it separately. These reheat beautifully—just pop them in the oven at 375°F for 5 minutes to get that golden crunch back. For parties, I always make double the batch—they disappear fast! Store leftovers in the fridge for up to 3 days, but honestly, they're best eaten fresh. Freezing? Not recommended—the breading gets soggy. Serve with extra toothpicks and a big bowl of that tangy-sweet dipping sauce!
Why You'll Love This Recipe
- No-Fuss Assembly: I swear by this recipe because it’s three steps and zero stress. Dip cheese sticks in flour, egg wash, panko—boom. Even my kid can handle it while I stir a pot of pasta.
- Crispy-Creamy Magic: That garlic powder in the panko? It’s the secret weapon. You get a shatteringly crispy crust with gooey melted cheese inside—like a hug in every bite.
- Party Snack Hero: Game nights, tailgates, or just because—these disappear fast. They’re easy to batch-make, stay fresh for days, and no one will guess they’re homemade.
- Budget Stretch: I buy cheese sticks in bulk, and this recipe turns them into something way fancier without breaking the bank. Leftovers? Perfect for lunchboxes or a quick snack.
Step-by-step instructions for cheese on a stick copycat recipe
Here's how to make those addictive, golden bites that taste just like your favorite fast-casual spot.
Prepare the Breading Station
In a shallow bowl, whisk together the 2 cups all-purpose flour, 1 tablespoon garlic powder, 1 tablespoon onion powder, 0.5 teaspoon salt, and 0.5 teaspoon ground black pepper. I like to use a fork for this—it creates a light, airy coating that sticks perfectly to the cheese sticks. Sift the flour first if it looks clumpy, so you get an even distribution of seasoning.
In a second bowl, crack the 2 whole large eggs and whisk them vigorously until the yolks and whites are fully combined. Room temperature eggs work best here—they create a smoother, more even coating that sets up perfectly when fried. In a third bowl, simply place the 3 cups panko breadcrumbs—no need to mix anything else in yet.
Dip and Bread Each Cheese Stick
Working with one mozzarella cheese stick at a time, dip it completely into the flour mixture, pressing gently to help the coating adhere. Shake off any excess, then dip into the beaten eggs, letting any excess drip off. Finally, roll the stick in the panko breadcrumbs, pressing firmly to ensure a thick, even coating all around.
I find it helps to work quickly but methodically—if you rush, the breading won't stick as well. Place each breaded stick on a wire rack or baking sheet as you go. This keeps them from sticking together while they wait to be fried. You'll have perfectly coated sticks ready for frying in just a few minutes.
Fry to Crispy Perfection
Heat 3 cups vegetable oil in a deep skillet or Dutch oven to 350°F—use a thermometer to monitor this carefully. The oil should be shimmering but not smoking when ready. Working in batches of 4-5 sticks (don't overcrowd!), carefully slide the breaded cheese sticks into the hot oil.
Fry for 2-3 minutes per side until the breading turns a beautiful golden brown color. You'll know they're done when they float to the surface—they're light enough that they won't sink when properly breaded. Use a slotted spoon to remove them and place on a paper towel-lined plate to drain excess oil. Keep the oil at 350°F between batches for consistent results.
Assemble and Serve Immediately
While the cheese sticks are still warm, insert a toothpick into each one to hold them together. Then, dip the bottom half of each stick into either the marinara sauce or ranch dressing—this is where they get that signature flavor combo. I like to do about half in each sauce for variety.
Serve them immediately while they're still crispy and melty inside. The contrast of the warm, gooey cheese with the cool, tangy sauce is what makes these bites so irresistible. If you need to hold them for a few minutes, keep them warm in a 200°F oven on a wire rack to maintain that perfect crunch.
Pro Tips For Making Cheese On A Stick Copycat
- Chill the Cheese First: Stick your mozzarella sticks in the freezer for 10-15 minutes before breading—this prevents the coating from sliding off when you dip. I learned this the hard way after watching three batches of breading peel away like wet newspaper.
- Use Room-Temp Eggs: Crack your eggs into a bowl and let them sit for 5 minutes before dipping. Cold eggs make for a thicker, clumpier coating, and nobody wants gluey cheese sticks. (Yes, even if you're impatient like me.)
- Press, Don’t Shake: When coating the sticks in panko, press the breadcrumbs firmly onto the cheese instead of just shaking them on. This locks the crumbs in place and guarantees a crispy crust that won’t fall apart halfway through frying.
- Fry in Batches of 3: Crowding the pan drops the oil temperature and turns your cheese sticks soggy instead of golden. Three at a time is the sweet spot—enough space for even browning without waiting forever. (Your future self will thank you.)
Essential equipment for great cheese on a stick copycat
Deep Fryer Essentials
For perfect results, I recommend using a deep fryer like the Ninja Foodi Deep Fryer—it maintains consistent oil temperatures and makes frying safer than a stovetop skillet. If you don’t have one, a heavy-bottomed Dutch oven (like All-Clad) works just as well.
The key is keeping the oil at 350°F—any hotter, and the breading burns before the cheese melts. I always use a candy thermometer to monitor the temperature. 🌡️
Oil Selection Matters
Vegetable oil or canola oil are my top picks for frying—both have high smoke points and neutral flavors. Avoid olive oil (it burns too easily) and peanut oil (unless you want a nutty taste). For a lighter option, avocado oil works beautifully and has a higher smoke point. Just be sure to use enough oil—at least 3 cups—so the cheese sticks can float freely without sticking. 🫒
Breading Tools
You’ll need three shallow bowls for the flour, egg wash, and panko breadcrumbs—I use glass or ceramic because they’re easy to clean and don’t absorb flavors. A wire rack (like the OXO Good Grips) is a game-changer for draining fried sticks—it keeps them crispy instead of soggy.
For breading, I grab long tongs (like Nordic Ware) to handle the sticks without crushing the coating. 🍞
Temperature Control
A digital thermometer (I swear by the ThermoWorks Thermapen) is non-negotiable—it ensures your oil stays at 350°F every time. If you don’t have one, test the oil by dropping in a small piece of bread—it should sizzle and turn golden in 30 seconds.
For air frying, a Ninja Foodi Air Fryer at 375°F works, but spray the sticks with oil first for extra crispiness. ⚡
Serving Setup
Toothpicks are a must—I use wooden skewers (like Duralast) for easy serving. For dipping, grab two small bowls: one for marinara and one for ranch. A slotted spoon (like Ozeri Touch) helps transfer sticks without dripping oil.
For parties, I set up a tray lined with parchment paper to keep things tidy and warm. 📌
Safety First
Always fry near a fire extinguisher and keep a oven mitt handy for handling hot oil. If you’re frying on the stovetop, use a lid to vent smoke away from your face.
For kids or beginners, an air fryer is the safest option—just supervise closely. I also recommend a timer** to avoid overcooking. 💡
Nutrition facts
Frequently asked questions
Can I make these cheese sticks without deep-frying?
For a lighter version, use an air fryer at 375°F for 8-10 minutes, flipping halfway. Spray the breaded sticks lightly with oil first for extra crispiness. If you prefer baking, place them on a wire rack in a 425°F oven for 10-12 minutes—just watch closely to avoid burning.
Why did my cheese sticks turn out greasy instead of crispy?
Greasy sticks usually mean the oil was too hot (over 375°F) or the breading wasn't pressed firmly enough. Use a thermometer to keep oil at 350°F, and press the panko extra hard during breading. Also, drain on a wire rack (not paper towels) to maintain crispiness while cooling.
What’s the best way to reheat leftover cheese sticks?
Reheat in a 375°F oven for 5-7 minutes on a wire rack to restore crispiness. For a quick fix, use an air fryer at 350°F for 3-4 minutes. Microwaving makes them soggy—avoid at all costs! Store leftovers in the fridge for up to 3 days in an airtight container.
Can I make these gluten-free or dairy-free?
For gluten-free, swap flour for 1 cup gluten-free flour blend and panko for crushed cornflakes or gluten-free breadcrumbs. For dairy-free, use dairy-free mozzarella sticks (like Miyoko’s) and ensure your breadcrumbs are gluten-free too. The texture will differ slightly, but the method stays the same!
How do I keep the cheese from melting too fast?
Use low-moisture mozzarella sticks (they melt slower) and avoid overcooking. Fry just until golden (2-3 minutes per side)—the cheese should be gooey but not oozing. Serve immediately to enjoy that perfect melty texture before it softens too much.