Main Courses
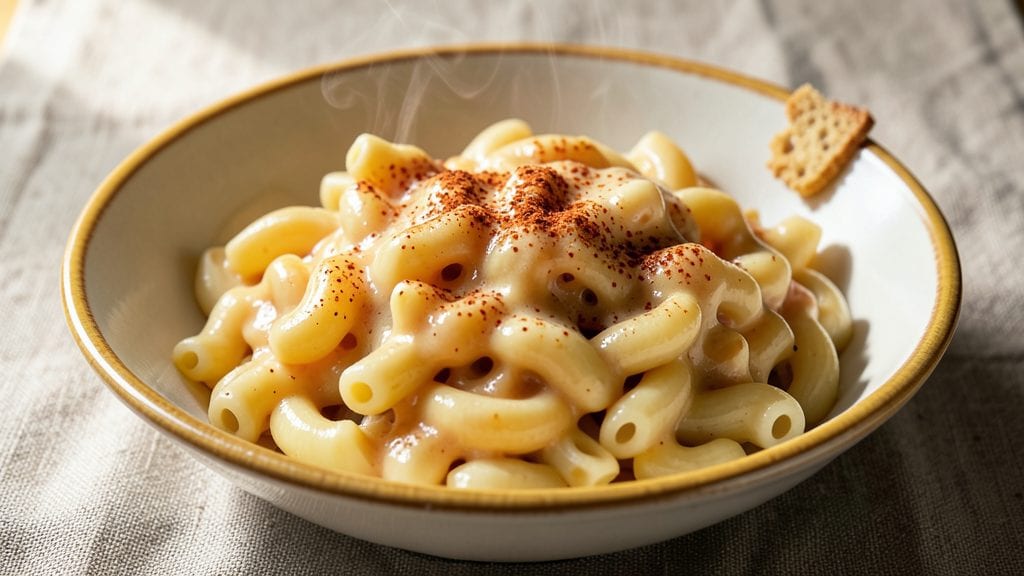
This Panera macaroni and cheese copycat recipe brings home that iconic crispy breadcrumb crown and velvety cheddar—now without the restaurant markup. This copycat recipe captures the essence of their famous dish: creamy, cheesy pasta topped with golden, buttery crumbs that stay perfectly crispy.
I've tested countless variations, and this method guarantees restaurant-quality results every time.
The secret lies in three key steps: using a blend of sharp cheddar and Gruyère for depth, cooking the pasta al dente so it doesn't turn mushy, and baking the breadcrumb topping separately before pressing it on top.
This ensures that crispy texture stays intact while the cheese below remains velvety and bubbly. The process is straightforward but requires patience—worth it for that first bite of perfect balance.
What you'll end up with is a dish that looks and tastes just like Panera's: golden, bubbling macaroni and cheese with a crown of crispy breadcrumbs that shatters at every bite.
The cheese sauce is rich but not heavy, and the pasta holds its shape beautifully. This recipe serves four hungry people, making it perfect for family dinners or game day gatherings.
Once you try this copycat version, you'll never buy takeout again. The best part? Leftovers reheat beautifully—just cover with foil and warm in the oven for a few minutes. Let's get cooking!
Ingredients for panera macaroni and cheese copycat
Pantry staples plus a few specialty cheeses—this copycat brings restaurant magic home.
| Ingredient | Amount | Notes |
|---|---|---|
| Elbow Macaroni 🍝 | 12 oz | Cooked al dente, drained |
| Sharp White Cheddar Cheese 🧀 | 3 cups | Shredded, block preferred |
| Gruyère Cheese 🧀 | ½ cup | Shredded, adds nutty depth |
| Unsalted Butter 🧈 | ¾ cup | Cold, cubed for sauce |
| All-Purpose Flour 🌾 | ¼ cup | For roux, all-purpose works |
| Whole Milk 🥛 | 2 cups | Warm, not scalding |
| Heavy Cream 🥛 | ½ cup | Full-fat for richness |
| Panko Breadcrumbs 🍞 | 1 cup | Japanese-style for extra crisp |
| Extra-Virgin Olive Oil 🫒 | 2 tbsp | For breadcrumb topping |
| Garlic Powder 🧄 | 1 tsp | For breadcrumb seasoning |
| Onion Powder 🧅 | 1 tsp | For breadcrumb seasoning |
| Salt 🧂 | ½ tsp | Kosher or sea salt |
| Black Pepper 🌶️ | ¼ tsp | Freshly ground preferred |
| Mustard Powder 🧂 | ½ tsp | For subtle tang |
| Gruyère Rind 🧀 | 1 piece | Optional, for extra flavor |
The cheeses are non-negotiable here. Sharp white cheddar gives that signature tang, while Gruyère adds nutty depth—both need to be freshly shredded (pre-shredded gets gummy). I grab mine at Whole Foods or the deli counter at Kroger, where they'll shred it fresh for you. For the Gruyère, look for French-style if you can find it—it melts like a dream. The Gruyère rind is optional but adds an incredible aroma when baking. If you skip it, just add an extra pinch of salt.
No panko? Regular breadcrumbs toasted in the oven first work in a pinch, but they won't be as crispy. Short on Gruyère? Extra sharp cheddar plus a splash of cream mimics the richness. The mustard powder is key—it cuts through the richness and gives that subtle tang Panera's version has. Want to make it even more decadent? Add 1 tbsp of cream cheese to the sauce. And if you're feeling fancy, toast the breadcrumbs with a little garlic butter instead of olive oil—the flavor difference is insane.
This reheats like a dream—just cover with foil and warm in the oven for 5-7 minutes at 350°F. The breadcrumb topping stays crispy for 3-4 days if stored properly (keep it in an airtight container). For leftovers, I like to portion it into individual ramekins so everyone gets that perfect crispy crown. Freezes beautifully too—just bake from frozen, adding 2-3 extra minutes to ensure the topping gets crispy.
Why You'll Love This Recipe
- Five-Ingredient Magic: I swear, the secret’s in that Gruyère-cheddar blend melting into a velvety sauce—no fancy techniques, just butter, flour, and a handful of pasta. Honestly, my kids think I’m a genius when I pull this off in 20 minutes.
- Weeknight Hero: Between us, this is the dish I make when I’ve got zero energy but still need dinner on the table. The roux locks in flavor while I toss the pasta—no babysitting required. (Yes, even on a Tuesday night.)
- Leftover Goldmine: I make a big batch on Sundays because reheated, this mac and cheese gets better—the sauce thickens just enough to cling to every noodle. My lunchbox is full for days, and so is my wallet.
- Potluck Stunner: Bring this to a gathering, and people will ask for the recipe. The nutty Gruyère and sharp cheddar combo feels fancy, but it’s just flour, butter, and elbow macaroni doing all the work. Not the prettiest, but the taste makes up for it.
Step-by-step instructions for Panera macaroni and cheese copycat recipe
Here's how to nail that iconic crispy breadcrumb crown over melty cheddar—just like Panera's famous version.
Cook the Elbow Macaroni to Al Dente Perfection
Bring a large pot of salted water to a rolling boil. Add the 12 oz elbow macaroni and cook until 1 minute before the package directions specify for al dente. This ensures the pasta stays firm enough to hold up under the cheese sauce without turning mushy.
Drain the pasta in a colander, then rinse briefly under cold water to stop the cooking process. Shake the colander vigorously to remove excess moisture—this helps the cheese cling better later. Transfer the drained pasta to a large bowl and set aside.
Make the Ultra-Creamy Cheese Sauce
In a separate large pot, melt the 0.75 cup unsalted butter over medium heat. Once melted, whisk in the 0.25 cup all-purpose flour to form a roux. Cook for 2-3 minutes, stirring constantly, until the mixture turns a light golden color and smells nutty.
Gradually whisk in the 2 cups warm whole milk and 0.5 cup heavy cream, ensuring no lumps form. Stir in the 3 cups shredded sharp white cheddar cheese and 0.5 cup shredded gruyère cheese, along with the 1 piece gruyère rind if using. Add the 1 tsp garlic powder, 1 tsp onion powder, 0.5 tsp salt, 0.25 tsp black pepper, and 0.5 tsp mustard powder. Stir over low heat until the cheese melts completely and the sauce thickens to a smooth, velvety consistency—this should take about 5-7 minutes.
Combine Pasta and Sauce for Maximum Cheesiness
Pour the hot cheese sauce over the drained macaroni in the bowl. Use a large spoon or spatula to toss everything together until the pasta is fully coated in the sauce. The mixture should look rich and glossy, with no dry spots. If the sauce seems too thick, whisk in 1-2 tablespoons of pasta water to loosen it slightly.
Transfer the macaroni and cheese to a 9x13-inch baking dish, spreading it out evenly. Press down gently to compact the mixture—this helps create a smooth surface for the breadcrumb topping. Let it cool slightly for 5 minutes before topping.
Create the Crispy Breadcrumb Crown
In a medium bowl, combine the 1 cup panko breadcrumbs, 2 tbsp extra-virgin olive oil, 1 tsp garlic powder, 1 tsp onion powder, 0.5 tsp salt, and 0.25 tsp black pepper. Mix well with your hands or a fork until the breadcrumbs are evenly coated and look moist but not wet.
Sprinkle the breadcrumb mixture evenly over the top of the macaroni and cheese, pressing down very lightly with the back of a spoon to help it adhere. The goal is to create an even, thin layer—don't worry if it's not perfectly smooth. Bake uncovered at 375°F for 20-25 minutes, until the top is deep golden brown and the edges are crispy.
Rest and Serve for the Perfect Texture
Remove the baking dish from the oven and let the macaroni and cheese rest for 5-10 minutes before serving. This resting time allows the cheese to set slightly, making it easier to slice without everything falling apart. The breadcrumb topping should be crispy on top and slightly softer underneath.
Cut into squares and serve immediately. Each bite should deliver melty, creamy cheddar with that satisfying crunch from the breadcrumb crown—just like the famous Panera version. Enjoy while warm, as the texture changes quickly once out of the oven!
Pro Tips For Making Panera Macaroni And Cheese Copycat
- Cook the pasta AL DENTE: Panera’s version relies on that slight bite—pull the elbows before they’re fully tender (about 2 minutes early). They’ll finish cooking in the cheese sauce, and the texture stays firm enough to hold up to the creamy sauce. I learned this the hard way when my first batch turned into mushy regret.
- Grate cheese FINE: Skip the box grater and use a food processor—pulse the cheddar and Gruyère until it’s almost powdery. This melts faster and gives that signature ultra-smooth, velvety texture. Yes, it’s extra work, but your sauce won’t separate or turn grainy.
- Bloom the roux LOW: Whisk in the flour and butter over medium-low heat until it’s a pale gold, not toasted. If you rush it, the roux will darken and add a bitter note to the cheese. I was skeptical until I tried it—now I won’t go back.
- Add liquid SLOWLY: Pour in the milk (or broth) a splash at a time, whisking like your life depends on it. If you dump it all in at once, you’ll end up with lumps that turn into sad, uncooked pockets of flour. Patience here guarantees a silky sauce.
Common mistakes when making this dish
Overcooking the Pasta
This is the #1 mistake I see—pasta that's mushy and turns to paste under the cheese sauce. Cook your elbow macaroni just 1 minute less than package instructions specify for al dente. The pasta needs to hold its shape under the weight of the cheese sauce.
I've ruined more mac and cheese than I'll admit by overcooking the pasta, so trust the timer and test it early. 🍝
Skipping the Roux Step
The roux is what gives the sauce that velvety, restaurant-quality texture. If you skip it or rush the 2-3 minutes of cooking, your sauce will end up grainy and weak.
Use unsalted butter and cook it over medium heat until it turns a light golden color—that's when you know it's ready for the flour. I've tried shortcuts, and they always let me down.
Using Pre-Shredded Cheese
Pre-shredded cheese contains anti-caking agents that make the sauce gummy and watery. Always buy block cheddar and Gruyère and shred it yourself using the large holes on your box grater. For the best results, shred the cheese right before making the sauce.
I keep a small bag of shredded cheese in my freezer for emergencies, but it's not ideal for this recipe.
Uneven Breadcrumb Topping
An uneven breadcrumb layer leads to some areas being soggy and others burnt. Mix the panko breadcrumbs with olive oil and seasonings until they're evenly coated and look moist but not wet.
Press them down lightly with the back of a spoon to help them adhere evenly. I've learned the hard way that patience here pays off—don't rush this step.
Baking at the Wrong Temperature
Baking at too high a temperature burns the breadcrumbs before the cheese is fully melted, while too low a temperature leaves them soggy. Stick to 375°F for 20-25 minutes. Use an oven thermometer to ensure your oven isn't running hot or cold.
I've had to throw out more than one batch when my oven was running hotter than I realized.
Not Resting Before Serving
Skipping the 5-10 minute rest means the cheese sauce will be too runny when you cut into it. This resting time allows the cheese to set slightly, giving you clean slices with that perfect melty texture.
I know it's tempting to dig in immediately, but trust me on this one—your patience will be rewarded. 💫
Nutrition facts
Frequently asked questions
Why does this recipe use two types of cheese?
The sharp white cheddar gives that signature tangy flavor everyone loves, while Gruyère adds nutty depth and a silkier melt. Together, they create the rich, velvety texture that makes this dish stand out. The Gruyère also helps prevent the sauce from becoming too heavy.
Can I make this dish ahead of time?
Yes! Assemble the macaroni and cheese up to 24 hours ahead and refrigerate uncovered. When ready to bake, add the breadcrumb topping and bake at 375°F for 25-30 minutes (the extra time accounts for the cold start). For a crowd, this is a lifesaver—just reheat and serve.
What if I don't have panko breadcrumbs?
Use regular breadcrumbs instead, but toast them first in a dry skillet for 3-5 minutes until golden. For extra flavor, mix in 1 tbsp melted butter and ½ tsp garlic powder before pressing onto the cheese. The texture won't be quite as crispy, but it'll still taste delicious.
How do I fix a runny cheese sauce?
Simmer the sauce uncovered for 5-10 extra minutes to evaporate excess moisture. If it's still too thin, mix 1 tbsp cornstarch with 1 tbsp cold water, stir into the sauce, and cook for 2 more minutes until thickened. Never skip the roux—it's the foundation for a smooth sauce!
Can I make this gluten-free?
Yes! Use gluten-free elbow pasta and substitute gluten-free breadcrumbs (or crushed gluten-free crackers). For the sauce, ensure all cheeses are certified gluten-free. The texture will be slightly different, but the cheesy flavor will still shine through.