Side Dishes
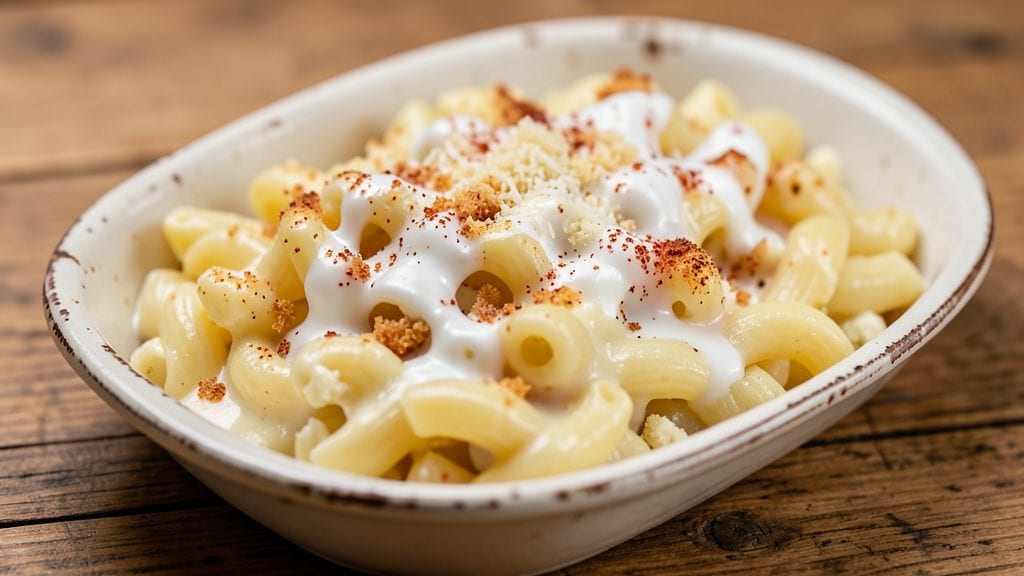
Recreating the Pioneer Woman's mac and cheese brings that perfect balance of rich, creamy comfort and satisfying crunch—just like the version that made her famous. This recipe delivers three distinct layers of cheese, each with its own texture and flavor, all baked until golden and bubbling.
The secret lies in the buttery breadcrumb topping that creates that signature crispy contrast.
What sets this mac and cheese apart is the technique: boiling the pasta al dente, then finishing it in the oven with the cheese sauce. The combination of sharp cheddar, creamy Gruyère, and tangy Parmesan creates depth that store-bought versions simply can't match.
I've tested this recipe countless times, and it never fails to deliver that restaurant-quality result in your own kitchen.
By the time it comes out of the oven, you'll have perfectly melted cheese with a crispy, buttery crust on top and tender pasta underneath. The aroma alone will have everyone gathering around the table.
This is the kind of dish that feels indulgent yet comes together with straightforward steps—ideal for weeknight dinners or special occasions.
Add crispy bacon or shredded rotisserie chicken for extra protein, or keep it vegetarian for a classic comfort food experience. The possibilities are endless, but the foundation remains the same: creamy, cheesy, and utterly satisfying. Let's get started on this timeless recipe.
Ingredients for pioneer woman mac and cheese
Sixteen ingredients for a dish that tastes like restaurant-quality comfort food.
| Ingredient | Amount | Notes |
|---|---|---|
| Elbow Macaroni 🍝 | 1 ½ lbs | Medium or jumbo size preferred |
| Sharp White Cheddar Cheese 🧀 | 1 ½ cups | Shredded, block preferred |
| Gruyère Cheese 🧀 | 1 cup | Shredded, aged 12+ months |
| Parmesan Cheese 🧀 | ½ cup | Freshly grated, not pre-shredded |
| Heavy Cream 🥛 | 1 cup | Full-fat for richness |
| Whole Milk 🥛 | 1 cup | 2% works in a pinch |
| Unsalted Butter 🧈 | ½ cup | Cold, cubed for topping |
| Panko Breadcrumbs 🍞 | ½ cup | Japanese-style preferred |
| Garlic Cloves 🧄 | 3 cloves | Minced, for flavor base |
| Yellow Onion 🧅 | 1 whole | Diced, medium size |
| Dijon Mustard 🍯 | 1 tbsp | For tangy depth |
| Kosher Salt 🧂 | 1 ½ tsp | Adjust to taste |
| Ground Black Pepper 🌶️ | ½ tsp | Freshly cracked |
| Nutmeg 🌿 | ¼ tsp | Freshly grated |
The cheeses are the heart of this recipe, so quality matters. Sharp white cheddar from brands like Cabot or Sargento delivers that signature tang, while Gruyère should be aged at least 12 months for proper depth—Whittard of Chelsea or Murray's are excellent choices. For Parmesan, grate it yourself from a wedge rather than using pre-shredded, which contains anti-caking agents that prevent proper melting. The pasta? Elbow macaroni works best—medium or jumbo size holds up better to the oven finish. Most grocery stores carry these, but specialty shops like Whole Foods often have better cheese selections.
No Gruyère? Substitute with extra sharp cheddar or Comté—both add nutty notes that work well. Running low on heavy cream? Half-and-half or whole milk will work, though the texture will be slightly lighter. For the breadcrumb topping, panko is non-negotiable—it provides that signature crunch. If you can't find it, crush regular breadcrumbs in a food processor for a finer texture. The Dijon mustard adds a subtle tang that brightens the richness—substitute with lemon juice if you're out, though the flavor will differ slightly. For the garlic and onion, fresh is best, but if you're in a bind, powdered garlic and onion at half the amount will suffice.
This dish reheats beautifully—cover with foil and warm in the oven at 350°F for 15-20 minutes. Store leftovers in an airtight container for up to 5 days, though it's best enjoyed fresh. The cheese sauce can be prepped ahead and kept in the fridge for up to 2 days before baking. For make-ahead convenience, assemble the dish in a baking dish, cover, and refrigerate overnight—bake straight from the fridge, adding 5-10 minutes to the cooking time. The breadcrumb topping can be toasted separately and sprinkled on top just before serving to maintain its crispiness.
Why You'll Love This Recipe
- One-Pot Magic: I swear by this recipe because it’s actually one pot—no extra bowls, no sticky mess. Just boil the pasta, melt the cheeses (that sharp cheddar + Gruyère combo? Chef’s kiss), stir in the cream, and you’re done. My sink stays clean, and my sanity does too.
- Triple-Cheese Bliss: Between the sharp cheddar’s bite, Gruyère’s nutty depth, and Parmesan’s salty finish, this isn’t just mac and cheese—it’s a flavor explosion. The heavy cream ties it all together without being heavy, and that crispy top? Worth every second under the broiler.
- Leftover Hero: This recipe begs to be made ahead. The flavors get richer overnight, and it reheats like a dream—no soggy pasta here. I pack it for lunches, freeze portions for lazy days, and my kids still fight over the last bite. (Yes, even after day three.)
- Budget Feast: Elbow mac, a block of cheddar, and a little Gruyère stretch to feed six for under $10. It’s my go-to for game nights, potlucks, or when I’m broke but refuse to eat sad cereal. Filling, fancy enough to impress, and always a hit. No excuses.
Step-by-step instructions for Pioneer Woman mac and cheese
Here's the method for creating a rich, layered mac and cheese with crispy breadcrumb topping.
Cook the Elbow Macaroni Al Dente
Bring a large pot of water to a rolling boil and add 1.5 lbs elbow macaroni. Stir immediately to prevent sticking. Cook for 11-12 minutes until the pasta is al dente - it should have a slight bite when you taste it. Drain the pasta in a colander and rinse briefly with cold water to stop the cooking process. This prevents the pasta from becoming mushy when mixed with the cheese sauce later.
While the pasta cooks, I like to prepare the cheese sauce ingredients. Keep the drained pasta warm in the pot over low heat with a splash of water to prevent drying out. This step ensures your mac and cheese stays creamy and perfectly textured.
Build the Three-Cheese Sauce
In a large saucepan, melt 0.5 cup unsalted butter over medium heat. Add 1 whole diced yellow onion and 3 cloves minced garlic, cooking for 3-4 minutes until softened. Stir in 1 tbsp Dijon mustard and cook for another 30 seconds to develop the flavor.
Gradually whisk in 1 cup heavy cream and 1 cup whole milk, bringing the mixture to a gentle simmer. Reduce heat to low and gradually add 1.5 cups shredded sharp white cheddar cheese, 1 cup shredded gruyère cheese, and 0.5 cup freshly grated parmesan cheese. Stir constantly until the cheese is completely melted and the sauce is smooth. Season with 1.5 tsp kosher salt, 0.5 tsp ground black pepper, and 0.25 tsp freshly grated nutmeg. The sauce should coat the back of a spoon and be luxuriously creamy.
Combine Pasta and Sauce
Add the cooked elbow macaroni to the cheese sauce and stir gently to coat each noodle evenly. The pasta should absorb the sauce completely, creating a thick, creamy mixture. If the sauce is too thick, add 1-2 tablespoons of pasta water to achieve the perfect consistency. Transfer the mixture to a greased 9x13-inch baking dish and spread it out evenly.
Here's the thing - don't worry if it looks too thick. The cheese sauce will settle as it bakes, creating that perfect creamy texture we're after. The key is to make sure every noodle is well-coated so each bite delivers maximum flavor.
Create the Crispy Topping
In a small bowl, combine 0.5 cup panko breadcrumbs with 2 tablespoons of melted butter. Spread this mixture evenly over the top of the mac and cheese, pressing down gently to ensure good contact with the sauce. This creates that perfect crispy contrast we all love in a baked mac and cheese.
For extra flavor, I like to sprinkle a pinch of kosher salt and ground black pepper over the breadcrumb topping. This enhances the crispiness and adds another layer of flavor to every bite.
Bake to Golden Perfection
Preheat your oven to 375°F. Place the baking dish on the middle rack and bake for 25-30 minutes until the top is golden brown and the edges are bubbling. The center should still be slightly soft - it will continue cooking as it rests.
I know it seems weird, but trust me - the mac and cheese will be perfectly creamy inside even if it looks slightly underdone. This is the moment that matters: when the breadcrumbs turn golden and crispy while the cheese underneath melts into a velvety sauce. Let it rest for 5-10 minutes before serving to allow the flavors to fully meld together.
Pro Tips For Making Pioneer Woman Mac And Cheese
- Cook pasta al dente: The recipe calls for elbow macaroni, but don’t follow the package timing—pull it when it’s just firm to the bite, about 1 minute before the box says. Overcooked pasta turns mushy in the cheese sauce, and you’ll end up with a gluey mess instead of that perfect creamy bite.
- Shred cheese aggressively: Skip the food processor for the sharp cheddar—hand-shredding gives you more surface area for melting. Use a box grater and work in batches, or pulse in a food processor but stop before it turns into crumbs. Gruyère’s natural oils need room to release, and fine shreds burn faster.
- Temper the cheese sauce: Don’t dump cold cheese into hot cream—it seizes up like scrambled eggs. Warm the heavy cream first (just until steaming), then whisk in the cheeses a handful at a time. I learned this the hard way when my sauce turned into a clumpy, sad lump.
- Finish with butter: The recipe might not say it, but stir in 2 tablespoons of cold butter at the end. It coats the pasta, adds richness, and prevents the sauce from breaking when you bake it. (Yes, even if you’re skipping the broiler step—it still makes a difference.)
Pro cooking tips for pioneer woman mac and cheese
Cheese Melting Secrets
Never let your cheese sauce boil—this causes it to separate and turn grainy. I keep the heat at a gentle simmer, stirring constantly until the cheeses melt completely. For stubborn clumps, add 1 tablespoon of cold milk at a time to break them down.
The key is patience—rushing this step ruins the creamy texture we're after. 🧀
Pasta Water Rescue
If your sauce thickens too much after mixing with pasta, don't panic. Add 1-2 tablespoons of reserved pasta water at a time until you reach that perfect velvety consistency.
I keep a small cup of pasta water nearby the whole time—it's liquid gold for fixing thick sauces. This also helps distribute the cheese evenly throughout the noodles.
Baking Time Tricks
Your oven's hot spots matter more than you think. For even browning, rotate the baking dish halfway through the 25-30 minute bake. If the top isn't golden enough, broil for 1-2 minutes at the very end—just watch it like a hawk to avoid burning.
The cheese should be bubbly but still creamy inside when done.
Crispy Topping Hacks
For extra-crispy breadcrumbs, toast them in a dry skillet over medium heat for 2-3 minutes before mixing with butter. This removes any moisture and amplifies the crunch.
I also like to press the topping down firmly with the back of a spoon to ensure maximum contact with the cheese sauce underneath. 🍞
Resting Matters
That 5-10 minute rest after baking is crucial—it lets the cheese set slightly and prevents a runny mess when serving. During this time, I always give the dish a gentle shake to redistribute any settled cheese. This step transforms good mac and cheese into restaurant-quality perfection.
Grandmother's Wisdom
My grandmother always said, "The best mac and cheese is the one that makes you lick your plate clean." She had a trick of adding ½ teaspoon of cornstarch mixed with 1 tablespoon of cold water to the cheese sauce just before baking—it thickens beautifully without altering the flavor.
I've been using it ever since, and it's become my secret weapon for ultra-creamy results. 💡
Nutrition facts
Frequently asked questions
Can I make this mac and cheese without Gruyère?
Replace the 1 cup Gruyère with an extra 1 cup sharp white cheddar or ½ cup each of sharp cheddar and Gouda. For a nutty alternative, try Comté or aged Gouda. The key is maintaining that rich, melty texture—just ensure your substitute cheese melts smoothly.
How do I keep the breadcrumb topping extra crispy?
Toast the panko breadcrumbs in a dry skillet over medium heat for 2-3 minutes before mixing with butter. This removes moisture and enhances crunch. For even more crispiness, broil for 1-2 minutes at the very end of baking—just watch closely to avoid burning.
Can I add protein like bacon or chicken?
Yes! Cook ½ lb crispy bacon or shredded rotisserie chicken separately, then fold into the pasta before baking. For extra flavor, mix in a splash of the bacon's rendered fat or chicken broth. Just reduce the cheese sauce slightly to maintain balance—this dish is already rich!
Why did my cheese sauce turn grainy?
This usually happens if the sauce boils or you add cheese too quickly. Always melt butter first, then gradually whisk in warm liquids (milk/cream) before adding cheese. If it happens, stir in 1 tablespoon cold milk to break up clumps. Patience is key—gentle heat and constant stirring prevent graininess!
Can I make this ahead of time?
Yes! Assemble the dish in a baking dish, cover, and refrigerate for up to 24 hours. Bake straight from the fridge, adding 5-10 extra minutes at 375°F. For make-ahead convenience, prep the cheese sauce 2 days ahead and store it covered in the fridge—just bake with fresh pasta.